Create an outline on a model with Stencils

I was currently looking around panda3d’s manual and haven’t found a good example of how to use stencils with shaders. I’m trying to make a colored outline on a single model using stencils and shaders but am having a hard time understanding how to do it. Does anyone have a good example or some shader code I could replicate?

(Looks like this) (Comes from a tutorial of how to do this using OpenGl)

So far I have found another way to apply this affect using Cartoon Painter, code from 13 years ago, but still works with a few modifications. I would still like to know a better way with the use of stencils.

It’s called cel-shading and yes it’s only way i found too

1 Like

I’m not sure how to achieve it using stencils. It seems that there is a scaled-up version of the model involved somehow. Do you have the original tutorial? I might be able to tell you how to map the OpenGL calls to the Panda3D equivalent.

1 Like

Here’s the link to the tutorial:
https://learnopengl.com/Advanced-OpenGL/Stencil-testing

Those glStencil calls can be translated to a StencilAttrib that can be assigned to your scene.
These lines:

glStencilOp(GL_KEEP, GL_KEEP, GL_REPLACE);  
glStencilFunc(GL_ALWAYS, 1, 0xFF); // all fragments should pass the stencil test
glStencilMask(0xFF); // enable writing to the stencil buffer

Translate to this:

scene.set_attrib(StencilAttrib.make(True, StencilAttrib.M_always, StencilAttrib.SO_keep, StencilAttrib.SO_keep, StencilAttrib.SO_replace, 1, 0xFF, 0xFF))

And these lines:

glStencilOp(GL_KEEP, GL_KEEP, GL_REPLACE);
glStencilFunc(GL_NOTEQUAL, 1, 0xFF);
glStencilMask(0x00); // disable writing to the stencil buffer
glDisable(GL_DEPTH_TEST);

Translate to this:

scene.set_attrib(StencilAttrib.make(False, StencilAttrib.M_not_equal, StencilAttrib.SO_keep, StencilAttrib.SO_keep, StencilAttrib.SO_replace, 1, 0xFF, 0x00))

There are multiple ways to apply this, including via multiple cameras and display regions (and possibly tag states or initial states on the camera), or by selectively instancing the models in question to a special node that contains the stencil state and using bins to control render order.

Note that there aren’t really shaders involved here; you can just use different render states to achieve a different color for the outline.

1 Like

Coming back to this (After a long time) I still cant get a prototype working. I have tried other techniques like instancing the model and changing its render order to always render behind the object, but it gives me mid results. Could someone possibly make an example of using the stencil attribute in this format? Am I possibly missing something like including shaders? Anything at this point can help.

I was kind of thinking of chucking a stencil buffer onto a CardMaker and attaching a shader to the Card. By changing the color of the Card to an alpha of 0, i was thinking the shader would outline any pixels around the object by detecting if the next pixel over is colored. This is a little bit hard to explain but it just crossed my mind. I will try and see if I can find a way of doing this but I’m not even sure if shaders can read the stencil buffer off the Card.

Yes, that could work; you would need to use a post-processing approach, eg. using FilterManager. It can get access to the stencil buffer that way. The advantage of that approach is that you can get an outline with a consistent radius.

For the record, here is an implementation of the stencil approach:

from panda3d.core import *

loadPrcFileData("", "framebuffer-stencil true")

from direct.directbase import DirectStart

env = loader.loadModel("models/environment.egg")
env.reparentTo(render)

box = loader.loadModel("models/box.egg")

# Make box centered on the origin so scaling works right
box.setPos(-0.5, -0.5, -0.5)
box.flattenLight()

boxOutline = render.attachNewNode("boxOutline")
boxNormal = render.attachNewNode("boxNormal")
box.instanceTo(boxOutline)
box.instanceTo(boxNormal)

boxOutline.setHpr(10, 0, 0)
boxOutline.setPos(0, 10, 0.5)
boxNormal.setHpr(10, 0, 0)
boxNormal.setPos(0, 10, 0.5)

boxNormal.setAttrib(StencilAttrib.make(True, StencilAttrib.M_always, StencilAttrib.SO_keep, StencilAttrib.SO_keep, StencilAttrib.SO_replace, 1, 0xFF, 0xFF))

boxOutline.setScale(1.03)
boxOutline.setTextureOff(1)
boxOutline.setLightOff(1)
boxOutline.setColor((1, 0, 0, 1), 1)
boxOutline.setDepthTest(False)
boxOutline.setAttrib(StencilAttrib.make(True, StencilAttrib.M_not_equal, StencilAttrib.SO_keep, StencilAttrib.SO_keep, StencilAttrib.SO_replace, 1, 0xFF, 0x00))

# Make sure outline is rendered after the regular box
boxOutline.setBin("fixed", 10)

render.ls()

base.run()

The disadvantage of this approach is evident: the scaling approach results in an inconsistent outline width depending on the proximity and angle of the object. What you’re suggesting is a better approach.

1 Like

Progress update:

I’ve managed to make a Cg shader than can outline objects in the camera view. The problem now is that it outlines every object in the scene when I only want a selected few to be outlined. I used your advice of using FilterManager with renderSceneInto to make a quad that overlays the screen. I then passed the stencil texture into the shader to do outlining. The question now is how do i seperate objects. I tried to use different cameras with BitMasks but still am stuck.


(Yes I am bad at 3d modeling)

My code for the camera stuff is as follows:

        self.cam_nodepath = NodePath(PandaCamera('outline painter cam'))
        self.cam = self.cam_nodepath.node()
        self.cam_nodepath.reparentTo(camera)

        self.perspective_lens = PerspectiveLens()
        self.perspective_lens = self.cam.getLens()
        self.lens = self.perspective_lens
        self.perspective_lens.set_aspect_ratio(window.aspect_ratio)
        self.perspective_lens_node = LensNode('perspective_lens_node', self.perspective_lens)
        self.lens_node = self.perspective_lens_node
        self.cam.set_lens(self.lens)


        self.dr = application.base.camNode.getDisplayRegion(0)
        self.cam.setCameraMask(BitMask32.bit(5))
        #self.display_region.setCamera(self.cam_nodepath)

        self.dr.setCamera(self.cam_nodepath)

        #self.manager = FilterManager(application.base.win, application.base.cam)
        self.manager = FilterManager(application.base.win, self.cam_nodepath)

        self.tex = PandaTexture()
        self.dtex = PandaTexture()
        self.stex = PandaTexture()

        self.quad = self.manager.renderSceneInto(
            colortex=self.tex,
            depthtex=self.dtex,
            auxtex=self.stex
        )

        self.quad.setShader(OUTLINESHADER._shader)
        self.quad.setShaderInput("tex", self.tex)
        self.quad.setShaderInput("depthTex", self.dtex)
        self.quad.setShaderInput("stencilTex", self.stex)

The ‘camera’ object is in referance to the default ‘base.cam’ and ‘application’ is just a variable to store showbase variables so that they don’t turn up red in my editor.

You need to mark the objects somehow as needing an outline. I’m not actually sure that FilterManager allows access to the stencil texture, on second thought. You can use the auxtex as you’ve been doing, but then you need to have a fragment shader applied to the objects that writes something to the auxiliary output to flag it appropriately.

Using a different camera is also possible, then you render that to a texture so that that’s the only thing contained in the buffer, and you know exactly where the object’s outline is.

Progress update!

I realized I was looking at the whole camera masking wrong. Instead of showing objects to a new display region and camera, I hid them from the camera. Then I compared the camera buffer texture to the window buffer. If the pixels didn’t match, It would mean that the outlined object is in that location on the screen.

Shader code as is follows:

void vshader(
    float4 vtx_position : POSITION,
    float4 vtx_color : COLOR,
    float2 vtx_texcoord : TEXCOORD,
    uniform float4x4 mat_modelproj,
    out float4 l_position : POSITION,
    out float4 l_color : COLOR0,
    out float2 l_texcoord : TEXCOORD0)
{
    l_position = mul(mat_modelproj, vtx_position);
    l_color = vtx_color;
    l_texcoord = vtx_texcoord;
}

void fshader(
    float2 l_texcoord0 : TEXCOORD0,
    out float4 o_color : COLOR,
    uniform sampler2D wintex : TEXUNIT0,
    uniform sampler2D cameratex : TEXUNIT1)
{   

    float4 camt = tex2D(cameratex, l_texcoord0);
    float4 wint = tex2D(wintex, l_texcoord0);

    float4 color = tex2D(wintex, l_texcoord0);

    float width = 0.0002;

    if(camt.x != wint.x || camt.y != wint.y || camt.z != wint.z || camt.w != wint.w){
        for(int i = 0; i < 10; i++){

            float4 c1 = tex2D(cameratex,  l_texcoord0 + float2(width * i, 0.0));
            float4 w1 = tex2D(wintex,  l_texcoord0 + float2(width * i, 0.0));

            float4 c2 = tex2D(cameratex,  l_texcoord0 + float2(-width * i, 0.0));
            float4 w2 = tex2D(wintex,  l_texcoord0 + float2(-width * i, 0.0));

            float4 c3 = tex2D(cameratex,  l_texcoord0 + float2(0.0, width * i));
            float4 w3 = tex2D(wintex,  l_texcoord0 + float2(0.0, width * i));

            float4 c4 = tex2D(cameratex,  l_texcoord0 + float2(0.0, -width * i));
            float4 w4 = tex2D(wintex,  l_texcoord0 + float2(0.0, -width * i));
            
            float4[] winarray = {w1, w2, w3, w4};
            float4[] camarray = {c1, c2, c3, c4};
            
            for(int b = 0; b < 4; b++){
                float4 cc = camarray[b];
                float4 ww = winarray[b];
                if(cc.r == ww.r || cc.g == ww.g || cc.b == ww.b){
                   color = float4(1, 1, 0, 1);
                   break;
                }
            }

        }
        //color = float4(1, 1, 0, 1);

    }

    o_color = color;
}

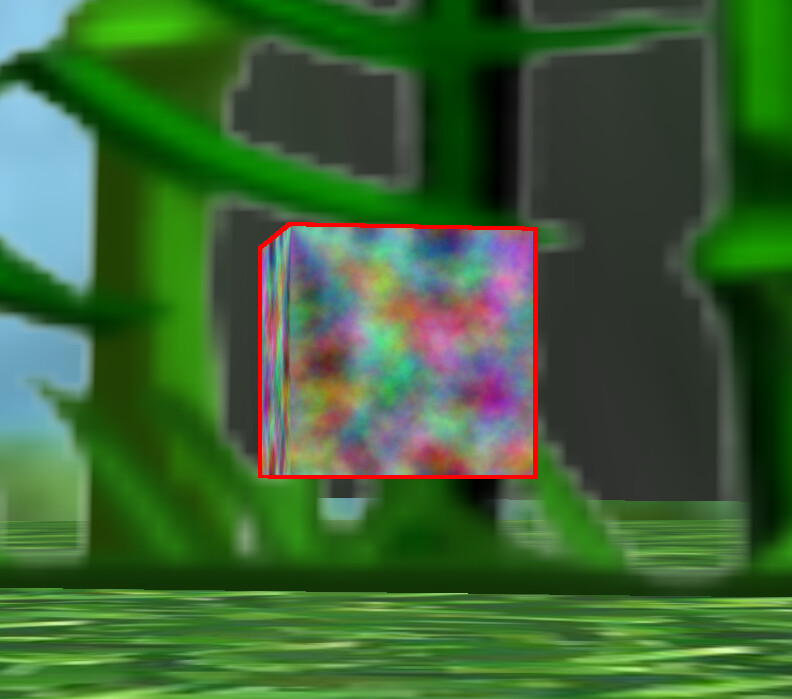
I know that it probably isn’t the most optimized and well thought out shader but it gets the job done. The ‘wintex’ is the window texture buffer and the ‘cameratex’ is the camera texture. The for loop is used to detect if the pixel is near the outline of the model (this is how I can specify the width of the outline).

My panda3d code is for the cameras is:

self.buf = application.base.win.makeTextureBuffer('normals_buf', 0, 0)
self.buf.setClearColor(Vec4(0, 0, 0, 0))
self.camera = application.base.makeCamera(self.buf, camName='normals_camera', lens=application.base.cam.node().getLens())
self.camera.reparentTo(camera)
self.camera.node().setCameraMask(BitMask32.bit(1))

self.win_buf = application.base.win.makeTextureBuffer('win_buf', 0, 0)
self.win_buf.setClearColor(Vec4(0, 0, 0, 0))
self.win_camera = application.base.makeCamera(self.win_buf,
                                                      camName='normals_camera',
                                                      lens=application.base.cam.node().getLens())
self.win_camera.reparentTo(camera)
self.quad.set_shader_input('wintex', self.win_buf.getTexture())
self.quad.set_shader_input('cameratex', self.buf.getTexture())

I then apply the shader to a 2d quad which then does the outlining.

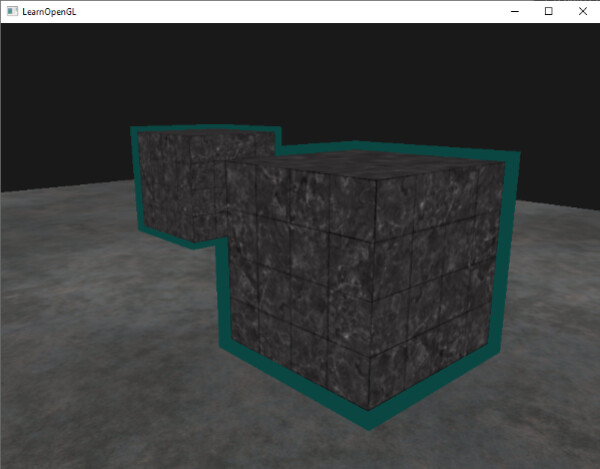
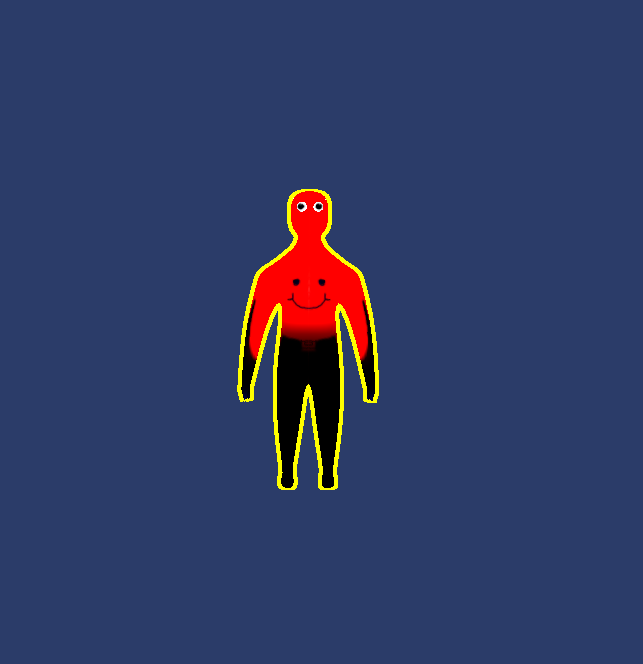
The final product looks like this:

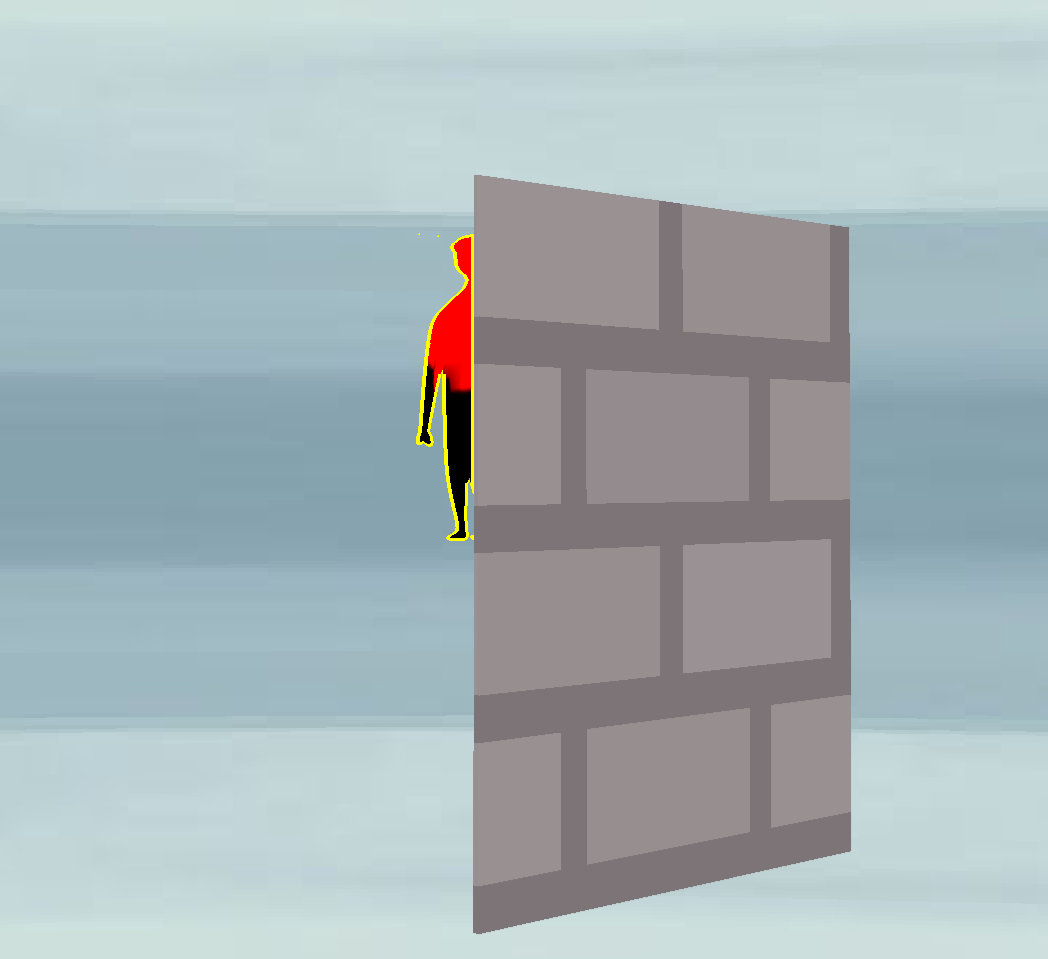
I do think there can be some more work to do like stopping the outline from showing when the object is partially around the wall, but all in all, I think I can finally close this thread and mark this as the solution (even this is no longer about stencils). I might post more complete code / results some time later if I decide to improve this but for the current project I’m doing, I think this will do.

2 Likes

Nicely done! To check if the object is being occluded by a wall, you can check the value in the depth buffer, whether it’s higher or lower.