Yes, thank you, and I do agree on the “looking like a game” point…
Last time I checked I can’t just change out the pictures on the website. I think complexpbr is at this point a Python module and I do actually agree with what somebody wrote recently at least in the sense of looking at panda3d more as a set of engine modules which yes, are maintained sort of by the hive mind so to speak. I am not sure how to proceed here but we could probably talk more about it.
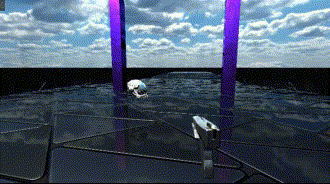
There are a whole bunch of artists out there and I imagine that eventually somebody will come along and use complexpbr and they will post something really high-concept and it will be alarmingly beautiful and so forth. This compilation of images is of stock PBR texture spheres, the damaged helmet from iirc Khronos, and an Intel and also an NVIDIA research sample. I think it works well for the git repository but yes take for that what you will.
I am going to learn some CG stuff. This project is a good material for study. It is simple yet comprehensive.
Could you provide some sample programs? I tried to integrate the amazing work into my project, but the shading results were weird. There must be something wrong with my code.
This is a minor release which includes an update to the LUT loading procedure, so that detection of a custom LUT happens more gracefully.
On an engine related note, I am excited to see some updates to CommonFilters coming from upstream. I’ll endeavor to continue supporting CommonFilters functionality in complexpbr. complexpbr.screenspace_init() will remain an optional alternative for the GLSL support it provides.
I consider complexpbr 0.5.4 production ready for game design. PRs and feature requests are welcome to expand screenspace_init() functionality, should anybody be interested in that. Specifically the Bloom feature could do with some modernizing; I implemented it by leaning on a Threshold value. If somebody would like to express a better implementation of Bloom in a PR for complexpbr, I’d be happy to review it.
Lastly, I would like to say thank you to all the complexpbr users, supporters and enthusiasts out there who star the repo and provide feedback on the various Panda3D channels.
Hi @Simulan congratulations on this huge achievement! It looks stunning.
I would like to ask a simple and naive question. I say naive because despite me being part of this community for some time now, my knowledge of game engines is pretty remedial. Panda3D is my first and only game engine, and I’ve only ever understood Panda3D to the extent that has been required by my use cases.
One “game changer” in the visuals of my application was when I switched from vanilla panda3d to panda3d-simplepbr. With a simple call to init, the visuals of my app went from “at least I’m rendering in 3D” to “that actually looks pretty good”.
Given the similarity in name between complexpbr and simplepbr, is complexpbr an alternative to simplepbr? And is there a simple “it just works” configuration the way that simplepbr has simplepbr.init()? There is a “Usage” section in the README.md, but it’s a bit jam-packed with lingo for me to make sense of.
Thank you @ekiefl for that very positive feedback – it’s actually been a longstanding dream of mine to reify real-time secondary bounces and so forth in a practical rendering engine. I’m glad it could happen entirely in the open source like this.
As Moguri mentioned a couple months ago (when somebody else asked this on the Discord channel), complexpbr is not a fork of simplepbr. complexpbr started “from scratch” but borrowed a fair amount from simplepbr to get going. ~3 years ago when I was beginning to write complexpbr for panda3d, I saved some time not reinventing the wheel with regard to accessing the basic panda3d shader constructs and stuff like that. I do think I took an entirely different approach architecturally, for instance the whole screenspace routine (which is separate from the basic apply_shader() call) is unique to complexpbr. Another difference is that complexpbr was designed to be declared at the node level, more procedurally.
That said, complexpbr is “complex” in that there is a lot of (potentially hard to understand) advanced functionality that strives for basically full generality, within the limits of what the engine can theoretically support. So my goals for complexpbr were tangential with simplepbr.
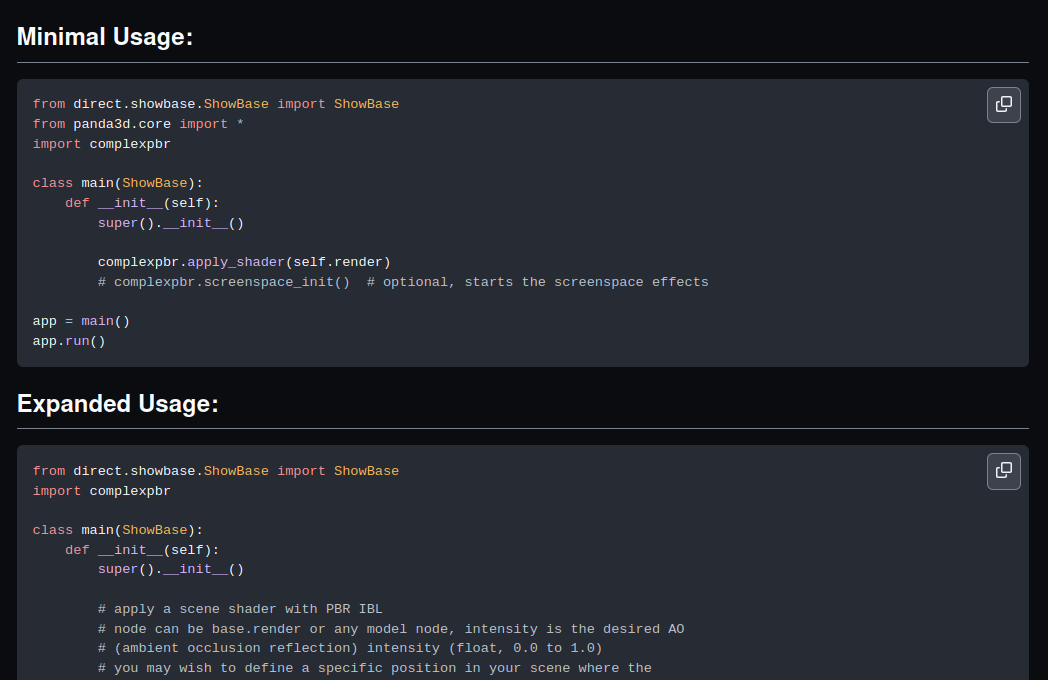
Yes, the most basic would be:
base = ShowBase()
complexpbr.apply_shader(base)
To be fair, I did warn potential users with the "complex"pbr part of the name!
Yep, the Usage section could probably use some optimization! It is the way it is now because I would like all the major functionality to be declared at least once there so that people can know how to use it. I’d like to avoid hosting a separate docs page at this point.
I do have a new complexpbr tutorial video planned, but I’m not sure when I’ll have time to cut all that together for YouTube. I also have a pandai-samples tutorial video planned for this year, which is my new (rather complicated) updated PandAI pathfinding sample program.
…okay, and now to announce complexpbr 0.5.6 features in a new post here!
This new release of complexpbr offers some important quality of life features, including a new optional way to keep your environment reflections tracking relative to the base camera’s world position. Visual example with setup code below.
        base.complexpbr_map_z = 2.1  # manual additive/subtractive factor on the rendering height
        # automatically adjust the environment reflections such that they
        # update relative to the base.cam position during movement
        base.complexpbr_z_tracking = True  # defaults to False
Additionally, as of version 0.5.6 , file cleanup of the four main shader files – ibl_f, ibl_v, min_f, min_v – is offered.
# clean up the shader files (not recommended for distributable builds)
complexpbr.remove_shader_files()
Very nice! It’s good to see this continuing to advance!
Maybe it would be worth starting the “readme” file with a brief summary and a full-but-simple example-program, with the fuller description and more-complex stuff declared in a section beneath that?
If I may, with the terms “IBL” and “BSDF” in that first paragraph, I might suggest either using their expanded forms, or having their expanded forms in parenthesis after them: a new user might not know what they mean, and so be confused.
This is a major release of complexpbr, offering a number of important new features.
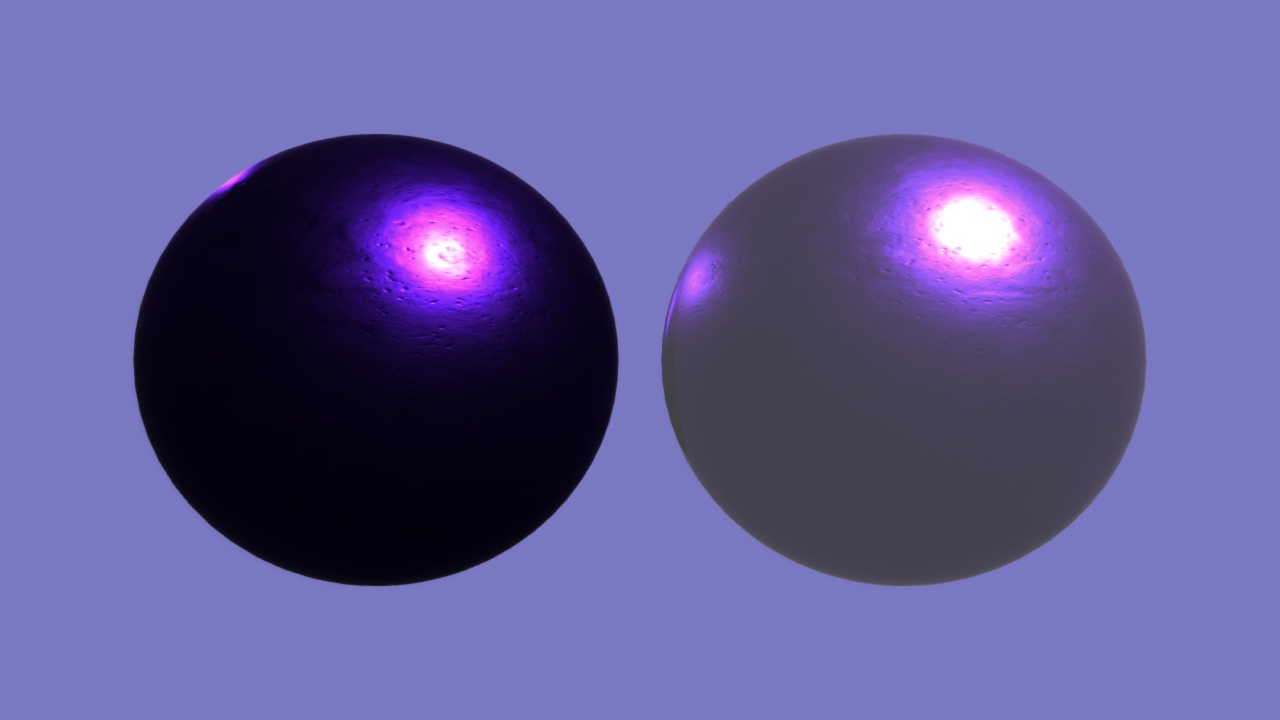
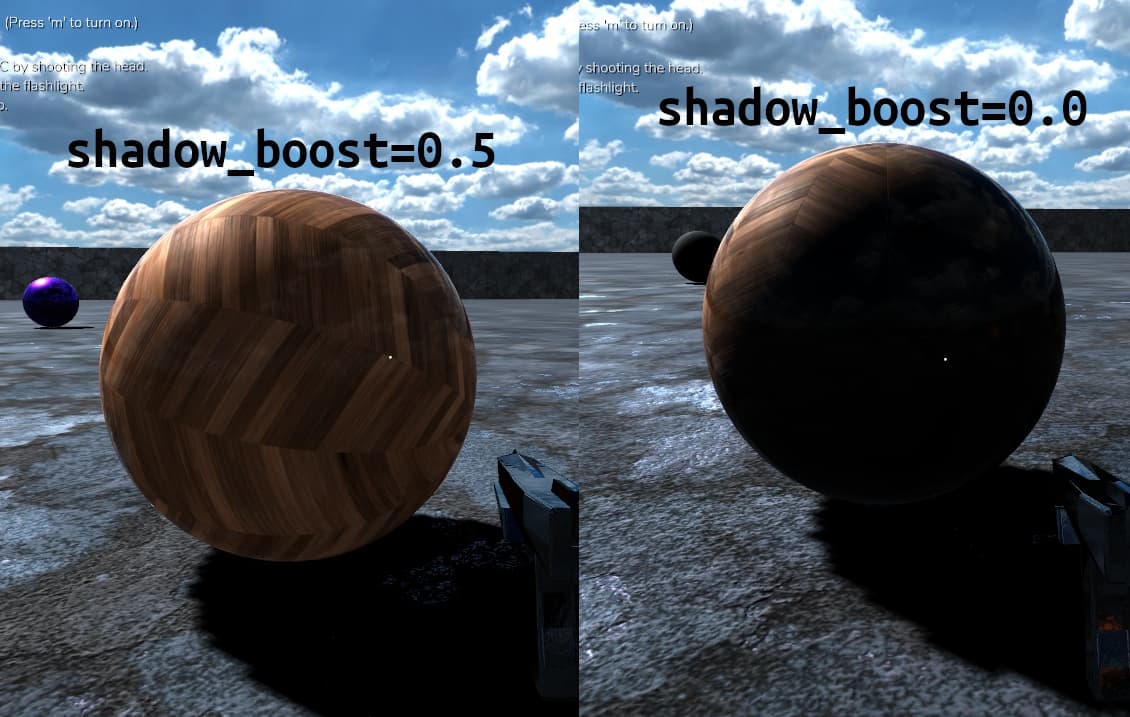
An approximation of Global Illumination (GI) is provided via the “shadow_boost” (float) shader input, example usage and comparison image below. This feature allows node level objects to partially self-illuminate to remain visible all around even when shadowed.
You may now specify a custom directory for complexpbr-generated shader files, IE complexpbr.apply_shader(…, custom_dir=‘shaders/’) .
A default lighting setup is provided as an option to apply_shader(…, default_lighting=True) .
The node-level vertex shader is now available for modification using “append_shader()”, see the project README.md for a full example.
The README.md has been reorganized and expanded for 0.5.9 to hopefully improve clarity for complexpbr users.
# example of how to turn on Global Illumination (GI)
self.main_bridge_tunnel.set_shader_input('shadow_boost', 0.3)  # increases intrinsic brightness of a tunnel model

# example of how to specify a custom shader directory (you must have created the folder first)
complexpbr.apply_shader(self.render, custom_dir='shaders/')

# example of how to use the default lighting environment
complexpbr.apply_shader(self.render, default_lighting=True)
This new implementation of GI samples the original albedo color and adds it to the existing PBR IBL color workflow based on the shadow_boost input float, which defaults to 0.0 . This feature, when properly used, should allow complexpbr-rendered projects to get closer to parity with deferred rendering packages such as RenderPipeline. The default forward rendering strategy, which I prize due to its objective performance, often renders the backside of objects shadowed by a Spotlight near-totally black. This makes getting appropriate backlighting tricky, as both PointLights and Spotlights pointed in the opposite direction to the shadowing Spotlight will naturally produce point highlights on any reflective surfaces on the object. What we want to see for such backlighting is rather a diffuse, almost intrinsic object illumination, as the backside would in real life be lit by many light bounces off the environment onto the shadowed region.
An approximation of Global Illumination (GI) is provided via the “shadow_boost” (float) shader input, example usage and comparison image below. This feature allows node level objects to partially self-illuminate to remain visible all around even when shadowed.
Forward rendering is generally a faster strategy for real-time rendering (IE frames per second) than deferred rendering such as that used in RenderPipeline. This is why, for instance, in the very performance-conscious domain of VR, AAA games have relied on forward rendering to get approximately 90 FPS for two perspectives (eyes) at the same time.
That said, forward rendering supports fewer total lights in practice than deferred rendering. This is where the new complexpbr GI approximation comes in handy, to sort of get the best of both worlds.
In my opinion, forward rendering is a pretty flexible way to achieve a “realistic” outcome. Some people prefer the appearance of deferred rendering. If you watch some AI-generated video remasters of AAA games, you can see how far from true realism both approaches probably are.
But practically speaking, if one has a screenshot of the same model in “forward renderer A” and in “deferred renderer A” then we could compare the two images and talk about specific differences.