Issues with the built-in shadows

I recently activated the built-in shadow-casting in my current project, and was pleasantly surprised at how simple it is to set up.

However, I’ve encountered some issues, and would appreciate advice on how to deal with them:

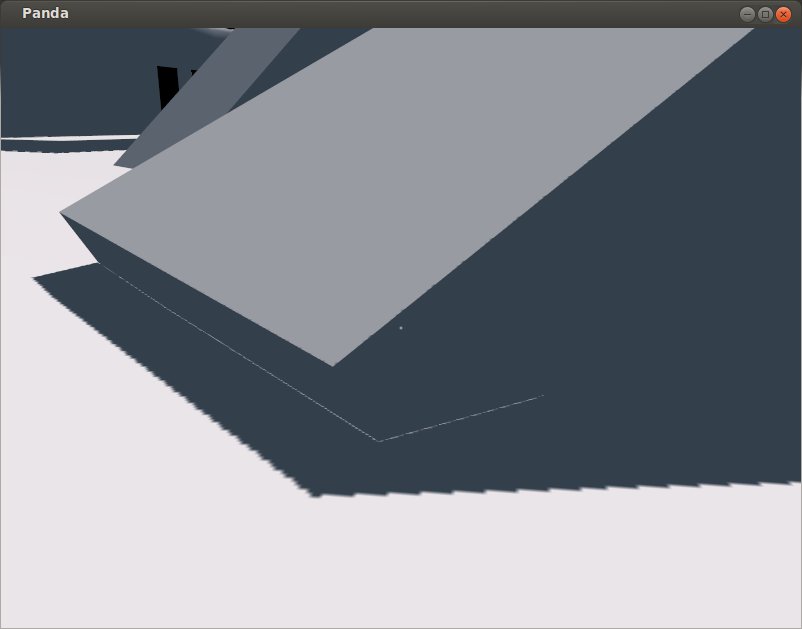
First, shadows have an unsightly line of brightness where they approach the geometry that casts them; it appears that the shadow doesn’t quite reach said geometry, leaving that region fully lit. The following screenshot should illustrate the effect:


Second, I seem to have the choice of either casting shadows over a sufficiently large area that the edges aren’t too apparent, or minimising the jagged edges of the shadows. As far as I’ve thus far found, these are primarily affected by the texture-size specified when calling “setShadowCaster”, and by the film size. I’m hesitant to increase the texture-size too much–am I being overcautious? As to the film-size, increasing it results in visible jaggies, while decreasing it causes the shadows to vanish at distances that seem quite nearby.

Here is the code that I use to set up the primary light for my levels:

        light = DirectionalLight("general light")
        light.setColor((1.0, 0.9, 0.85, 1))
        light.setShadowCaster(True, 4096, 4096)
        light.getLens().setFilmSize(Vec2(30, 30))
        light.getLens().setNearFar(10, 40)
        lightNP = render.attachNewNode(light)
        lightNP.setHpr(-45, -45, 0)
        lightNP.setPos(-14, -14, 14)
        self.rootNode.setLight(lightNP)

        # The ambient light is set up here; I'm omitting
        #it for brevity's sake.

        #Elsewhere in the initialisation code:
        lightNP.reparentTo(self.player.manipulator)
        lightNP.setCompass()

It may be worth noting that my project is not an open-world game; it’s unlikely that I’ll have shadows being cast over large vistas.

There is one point that may complicate the answer: I have in mind the idea of using vertex colours to affect the intensity of the main- and ambient- lights, but not that of the player’s “lantern” light, allowing me to produce levels with both dark and bright regions. The basic idea would be to multiply the calculated light intensity of the main- and ambient- lights by this scalar value. My best guess at how I might do so would be to dump and modify the automatically-produced shaders, then applying these manually (presuming that doing so is acceptable…?), but I’m very much open to other suggestions.

So, what should I do? Are there improvements to be made to my settings above? Features that I’m unaware of? Or should I be using some other shadowing technique, and if so, what do you recommend?

My thanks for any help given! :slight_smile:

I’m not familar with pandas internal shadow and lighting system, but the first issue looks like its caused by a too high bias combined with backface rendering.

You should try rendering the shadows with the frontfaces of the geometry, to elimate those issues. You can try reducing the bias aswell, but in my experience you will never get satisfying results with backface rendered shadows.

Yeah, thats a common issue, usually you don’t want to have a huge texture size, especially for outdoor scenes.
A common approach to that is PSSM (parallel split shadow maps). This is an excellent article about it: http://http.developer.nvidia.com/GPUGems3/gpugems3_ch10.html
(Just FYI, thats also what I’m using in the pipeline for sun shadows)

Edit: Found something using stock panda: https://github.com/treeform/panda3d-CSM, last commit is from 2009 though, I’m not sure if it still runs.

I don’t have an answer for your main and ambient lights - I believe you could go with dumping the generated autoshader shaders, although that rather sounds hacky. I’m not sure if panda has influence volumes for ambient lights, but I doubt so. I only know that usually (in a physically based shading context), you would have environment probes instead of ambient lights anyways, so you don’t have that issue at all.

The light bleeding is caused by the fact that when rendering the shadow map, Panda will only consider the back faces (rather than the front faces) of models. It does this in order to avoid a more nasty artifact called “shadow acne”. It has the unfortunate side effect that light may sometimes bleed through tight edges such as in your screenshot.

Fortunately, it is easy to fix this in the modelling program. By extending the edge of the box such that it extends below the ground it should no longer be causing this issue.

The alternative approach I don’t recommend is to disable the reverse culling, but this can cause issues and will require you to apply a bias to avoid shadow acne, which can therefore cause the same issue (which tobspr assumed you were using).

As for vertex colours, you may want to use a custom shader for this kind of thing. As of 1.10, you can still use Panda’s built-in shadow maps from your GLSL shader, saving you from having to set up the shadow buffers yourself.

Thank you both for your responses. :slight_smile:

I’m honestly not sure of how to have Panda use the front-faces for shadow-generation; attempts at testing something to this effect by making my geometry two-sided and playing with depth-biases solved this problem, but introduced others, I believe. I don’t think that I have any bias applied at the moment. :confused:

In all fairness, I don’t intend to have many huge outdoor scenes, and in any cases that I might have I can probably fake distant shadows. For example, my current scene is set in something like a large enclosed garden, with no distant vistas to render.

Thank you for the links! I may try out treeform’s approach if no better solution turns up. :slight_smile:

I don’t intend to approach physically-based rendering in this project; indeed, I’m aiming for a somewhat painterly look.

Are environment probes as hard on a game’s minimum requirements as they sound? ^^;

Having just checked, the box pictured above does seem to extend below the ground. :confused: (The block pictured there is more or less rectangular; note how the corner cuts off at ground-level.)

I’m also seeing much the same effect in the corners of an interior room; fixing those issues as described would presumably mean extending each face of the room (or at least those that show such issues) such that they no longer join their neighbours.

Indeed, as I mentioned to Tobias above, my experiments with this have proven to fix this issue at the cost of producing others. :confused:

Hmm… Do we know roughly when 1.10 is due out?

Otherwise, do you have a recommended shadow algorithm?

Usually rendering front-faces is sufficient for getting correct shadows.

However, I think the issue is tha panda only supports a fixed bias (iirc). You would need a normal based, slope based and fixed bias in order to get proper shadow mappi g without shadow acne. The normal based bias basically works by offsetting the surface position in the normal direction. The slope based bias works by offsetting the position into the lights direction, based on the slope. And after that, the fixed bias gets applied on top of that.

Maybe pandas shader generator can be improved to support this multiple biases.

1 Like

I fear tobspr and I are giving you conflicting advice. :-/ In my opinion, rendering back faces is the best way to avoid artifacts, and creating extra geometry to patch up corners. Rendering front faces (or using double-sided rendering for that matter) will result in shadow acne, which can be worked around using a depth offset (nodePath.setDepthOffset(1)), but this will cause peter panning artifacts that will also cause light to bleed through corners like that one.

You can download development builds of 1.10 on the download page.

Either way, I appreciate the input provided by you both. :slight_smile:

I’ve done a bit of reading, and this Microsoft article at least seems to support Tobias’ recommendation of culling back-faces, along with other approaches to dealing, specifically the section “Back Face and Front Face”, near the bottom, along with other approaches to preventing erroneous self-shadowing (they seem to prefer adjustments to the light frustum, but do mention biasing as well.

Hmm… I have a related idea that I’d like to run by you two, if I may. It may be silly, but it seems worth checking, at least.

Simply put, is it feasible (and sensible) to use the transformed z-coordinate of a fragment, stored in a render texture, instead of the automatically-produced depth-buffer? If I’m to end up writing my own shaders anyway, I have it in mind to create a single shader that takes as input the matrices of my two main lights (in addition to the “sun”/“main” light, the player has a “lantern” light), applies them to each fragment position, then outputs their z-coordinates to separate channels of a texture.

Is that a good idea, or will it likely be worse than simply using the traditional methods?

Ah, right, of course–I should have checked there, to be honest. ^^; Thank you!

I am only telling you how I implemented it in the RenderPipeline, and since I have no issues with shadow acne nor panning artifacts, I thought it’d be worth a recommendation. I think most game engines also do it that way, at least they claim so in their presentations.

If you are further interested in shadows, also checkout this presentation: http://www.crytek.com/download/Playing%20with%20Real-Time%20Shadows.pdf, it might be a bit more in depth than required, but it has a nice slide about Shadow Aliasing (slide 57):

Different scenarios to overcome aliasing
 Sun shadows: front faces rendered with slope-scaled depth bias
 Point light shadows: back face rendering, works better for indoors
 Variance shadows for distant LODs - render both faces to shadow maps
 Constant depth bias during deferred shadow passes to overcome
depth buffer precision issues

You mean writing out linear depth to overcome precision issues? If so, I do not recommend that.
There are two ways of implementing the way you described:

  1. Write out custom depth (using gl_FragDepth).
    → This is bad, since it breaks rasterization optimizations and early-z, its worse if you would have multiple attachments or a heavy fragment shader, but its bad in all cases.

  2. Write out custom depth as a color texture

    • This is bad in two ways, first you need twice the storage, then you require more bandwith, and you also
      can not take advantage of depth-only rendering (depth only rendering can be twice as fast as regular rendering, since you don’t write to a color buffer nor execute a fragment shader - except if you use gl_FragDepth in your fragment shader which breaks this optimization, too)

So, you can try it, but I’d guess that its slower than just using the fixed function pipeline which writes out logarithmic depth.
I also do not think that it would solve your problem, since your problem is a too high general bias (due to backface rendering), and not a precision issue.

You also cannot just take the two matrices of your lights and render them to the fbo in a single shader - you will have to transform your vertices using either one of them, but not two at a time, so you will need two render passes anyways.

Fair enough.

Thank you for that! :slight_smile:

Indeed, it does look as though it likely goes into a bit more depth than I’m currently interested in, but I probably will take a look through it for elements useful to what I’m doing at the moment.

Ah, fair enough; the points that you mention against it do seem to somewhat kill the idea. :confused:

Thank you for the analysis! :slight_smile:

[edit]
Disregard the paragraphs below, and see my response to rdb in my next post; I realise now that I missed the point that I’d lose depth-testing if I just treated the vertex transformations as simple mathematical operations. :confused:
[/edit]

Could I not pass the light’s matrices in as shader inputs, then multiply the vertex-position by each, storing the results in colour channels of my output buffer? As far as I see at the moment (and I do admit that I’m still somewhat unversed in shaders), their matrices should be nothing especial; I should be able to pass them in just as any other matrix. Am I mistaken regarding some point in that?

(I do realise that this doesn’t save the idea, even if I am correct; I’m just arguing this specific point.)

Fair enough. You should be able to disable the default culling setting like this:

light.setInitialState(a.getInitialState().removeAttrib(CullFaceAttrib))

The biasing can be done with DepthOffsetAttrib. You can simply call setDepthOffset(1) and it may be enough; there are more advanced settings on the DepthOffsetAttrib that tweak the depth range for more advanced control.

Even more advanced biasing will have to be done using a shader. I’m afraid that the shader generator doesn’t currently support in-shader biasing, but I’d be happy to add this feature if it is desired.

Yes, you can write the depth value to the color buffer. It’s a bit of a waste though - you’d have to re-enable the ColorWriteAttrib that’s by default disabled on the light’s initial state, which will cause rendering the shadow maps to be 2x as slow (at least on NVIDIA cards).

It doesn’t work exactly like that because the vertex shader only outputs a single set of screen-space coordinates to the rasterizer. You can’t rasterize fragments from two different points of view simultaneously.

What you can use is instancing. You call setInstanceCount(2) on your scene so that the vertex shader is run twice for every vertex, and then you use gl_InstanceID to select which modelview matrix to use. You will need some sort of blend mode that will allow you to write to separate channels. You could render both instances of the scene to separate regions within the texture using viewport arrays, or separate pages of a texture array using layered render-to-texture, but this (annoyingly) requires the use of a geometry shader, which can be a performance hit.

Without either of those techniques, I don’t think you can selectively render to either one or another render target, I’m afraid. Perhaps tobspr, who has more experience experimenting with these techniques, has more ideas here.

Keep in mind that Panda can’t cull as effectively this way; you would need a cull bounds that encloses both light frusta (or disable culling entirely), since you’re only passing the geometry to the GPU once.

Ah, I wondered whether there wasn’t a way to do it! Thank you!

As I indicated above, I’m now looking into a custom shader anyway; I may well attempt to implement some of the biasings that Tobias mentioned once I have the more important features working acceptably.

(I’m currently wrestling with the “advanced shadows” tutorial. For some reason my adaptation of the code isn’t working properly, despite appearing to closely match the original. If my continued experiments today don’t work out, I may end up starting a new thread asking for help with it.)

Hmm… I responded to Tobias above, but thinking about it again, I realise that I’m missing the point that even if I were to simply apply the light matrices as simply mathematical operations to the vertices, then store the results in a colour buffer, I would of course lose depth-testing.

Bah, I do feel silly for having missed that! >_<

Ah well, thank you for your analysis of the idea!

Based on what you and Tobias have said, I think that I’m going to simply discard the idea: while it may be possible (such as via the instancing method that you suggest), it doesn’t look as though it would be likely to actually be beneficial. Even if did turn out to be in some way possible to increase performance by some adaptation of the idea, it doesn’t seem to be worth it to me given the likely investment of time and effort.

Just to clarify, its not possible at all to render vertices with two matrices at one time. If you do what rdb suggested, (setInstanceCount), your geometry basically gets duplicated on the GPU, and you render one set of the vertices with your first matrix, and the second set of your vertices with the second one.

This is due to how the rasterizer / general fragment pipeline works: It expects exactly one output position, which it then interpolates and uses to rasterize your geometry. The rasterizer is not capable of rasterizing geometry using two or more different matrices, which is why your approach of writing two depths would not work at all.

You could use layered rendering / viewport arrays, however that will be slow since you need to use a geometry shader (except on AMD cards which allow writing to gl_Layer in the vertex shader).

As a recommendation, which might change with newer hardware and architectures:

First of all, I really do recommend using the standard depth texture generation supported by the FFP. It will most likely be the fastest you can get. Writing to a color channel, with a blending attribute for example, will be much slower (and consume more memory).

If you need to generate multiple shadow maps, I would render them to the same FBO but using different display regions (and cameras ofc). This way you can benefit from culling, and you only have to bind one texture to your shaders. You can also render to multiple FBOs, but even that will very likely be faster than using some layered rendering (again, I’m only talking from my experience here, different setups and architectures might perform totally different).

Fair enough, and thank you for the clarifications. :slight_smile:

Hmm, that’s an interesting idea, thank you. I consider doing so once I have the basic, two-buffer version working.

Six years later I´d like to catch up :slight_smile:
how can we omit these jagged edges?