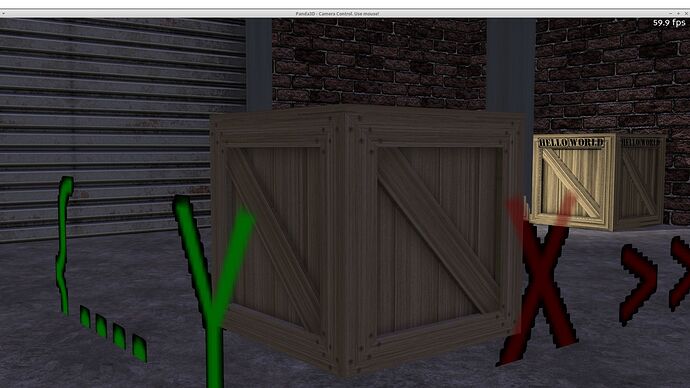
To help with the positioning of the TextNodes, you could call get_tight_bounds on both the box and the TextNodes. This method returns the point at the corner with the smallest coordinate values and the point at the corner with the biggest coordinates. Subtracting these values also gives you the sizes of those objects.
box_point_min, box_point_max = box.get_tight_bounds()
# make sure the text node is at position (0, 0, 0) and has
# the desired size and orientation
txt_point_min, txt_point_max = text_np.get_tight_bounds()
box_top = box_point_max.z
txt_top = txt_point_max.z
# align top of text node to top of box
text_np.set_z(box_top - txt_top)
# assuming the text node is to be attached to the front side
# of the box, align its left edge to the left edge of the
# front side of the box...
box_left = box_point_min.x
txt_left = txt_point_min.x
text_np.set_x(box_left - txt_left)
# ...and align its y-coordinate to the front side of the box
box_front = box_point_min.y
txt_front = txt_point_min.y
text_np.set_y(box_front - txt_front)
To decal the text onto the box (another way to avoid z-fighting), you can do something like this:
text_np.wrt_reparent_to(box)
box.set_effect(DecalEffect.make())
Alternatively, you could render the text nodes directly into an “overlay” texture, so you don’t need to worry about z-fighting at all. This method does not necessarily qualify as “easy”, but if positioning TextNodes is just too cumbersome, it might be worth looking into.
To make this work, you will need to add an additional set of UVs to your boxes and give them a specific name. Giving the vertices of every box side completely different UVs should already make it easier to identify a specific side of the box.
In Panda, you can then use render-to-texture to render the TextNodes into a new texture that you overlay on top of the primary box texture using multitexturing.
Then it’s a matter of attaching the TextNodes to a new scenegraph that represents “UV space” and giving them a position within the rectangular XZ-area that corresponds to the UV portion occupied by the box side they should appear on.
Here’s a fully working code sample that shows a cube with a different counter on each of its vertical sides; the counters are constantly incremented in real-time.
from panda3d.core import *
from direct.showbase.ShowBase import ShowBase
import array


def create_cube():

    vertex_count = 0
    values = array.array("f", [])
    overlay_uvs = array.array("f", [])
    indices = array.array("H", [])
    # use an offset along the U-axis to give each side of the cube different
    # texture coordinates, such that each side shows a different part of a
    # texture applied to the cube
    u_offset = 0.

    for direction in (-1, 1):

        for i in range(3):

            normal = VBase3()
            normal[i] = direction

            for a, b in ((-1., -1.), (-1., 1.), (1., 1.), (1., -1.)):

                pos = Point3()
                pos[i] = direction
                pos[(i + direction) % 3] = a
                pos[(i + direction * 2) % 3] = b
                uv = (max(0., a), max(0., b))
                u, v = [pos[j] for j in range(3) if j != i]
                u *= (-1. if i == 1 else 1.) * direction
                overlay_uv = (max(0., u) / 6. + u_offset, max(0., v))

                values.extend(pos)
                values.extend(normal)
                values.extend(uv)
                overlay_uvs.extend(overlay_uv)

            u_offset += 1. / 6.
            vertex_count += 4

            indices.extend((vertex_count - 2, vertex_count - 3, vertex_count - 4))
            indices.extend((vertex_count - 4, vertex_count - 1, vertex_count - 2))

    vertex_format = GeomVertexFormat.get_v3n3t2()
    vertex_format = GeomVertexFormat(vertex_format)
    array_format = GeomVertexArrayFormat()
    array_format.add_column(InternalName.get_texcoord_name("overlay"), 2,
        Geom.NT_float32, Geom.C_texcoord)
    vertex_format.add_array(array_format)
    vertex_format = GeomVertexFormat.register_format(vertex_format)

    vertex_data = GeomVertexData("cube_data", vertex_format, GeomEnums.UH_static)
    vertex_data.unclean_set_num_rows(vertex_count)
    data_array = vertex_data.modify_array(0)
    memview = memoryview(data_array).cast("B").cast("f")
    memview[:] = values
    data_array = vertex_data.modify_array(1)
    memview = memoryview(data_array).cast("B").cast("f")
    memview[:] = overlay_uvs

    tris_prim = GeomTriangles(GeomEnums.UH_static)
    tris_array = tris_prim.modify_vertices()
    tris_array.unclean_set_num_rows(len(indices))
    memview = memoryview(tris_array).cast("B").cast("H")
    memview[:] = indices

    geom = Geom(vertex_data)
    geom.add_primitive(tris_prim)
    node = GeomNode("cube")
    node.add_geom(geom)

    return node


class MyApp(ShowBase):

    def __init__(self):

        ShowBase.__init__(self)

        # set up a light source
        p_light = PointLight("point_light")
        p_light.set_color((1., 1., 1., 1.))
        self.light = self.camera.attach_new_node(p_light)
        self.light.set_pos(5., -100., 7.)
        self.render.set_light(self.light)

        # for the sake of not having to provide an external model, a box is
        # generated procedurally here,...
        box = self.render.attach_new_node(create_cube())
        tex = self.loader.load_texture("maps/envir-rock2.jpg")
        box.set_texture(tex)
        # ...but in your project you can just load your own model of course
#        box = self.loader.load_model("box")

        # create a new TextureStage to apply the overlaid texture, using the
        # secondary set of UV coordinates
        ts = TextureStage("overlay")
        ts.set_mode(TextureStage.M_decal)
        # make sure to use the name of the secondary UV-set added to the box model
        ts.texcoord_name = InternalName.get_texcoord_name("overlay")
        overlay = Texture("overlay")
        # apply the overlaid texture
        box.set_texture(ts, overlay)

        # create a new scenegraph representing UV-space
        uv_space = NodePath("uv_space")

        self.text = "Counting"
        self.counters = counters = {}
        self.text_nps = text_nps = {}

        for side in ("front", "back", "left", "right"):
            counters[side] = 0
            text_node = TextNode(f"box_{side}_text")
            text_nps[side] = text_np = uv_space.attach_new_node(text_node)
            text_np.set_scale(.05 / 6., 1., .05)

        # The exact position of each TextNode depends on the layout of the
        # secondary set of UV coordinates. In this example, the vertical sides
        # of the box are placed from left to right in UV-space, as follows:
        # left, front, right, back.

        text_np = text_nps["left"]
        text_np.node().text_color = (0., 0., 1., 1.)
        text_np.set_pos(.03, 0., .95)

        text_np = text_nps["front"]
        text_np.node().text_color = (1., 0., 0., 1.)
        text_np.set_pos(.2, 0., .95)

        text_np = text_nps["right"]
        text_np.node().text_color = (0., 1., 0., 1.)
        text_np.set_pos(.53, 0., .95)

        text_np = text_nps["back"]
        text_np.node().text_color = (1., 1., 0., 1.)
        text_np.set_pos(.7, 0., .95)

        props = FrameBufferProperties()
        props.set_rgba_bits(8, 8, 8, 8)
        tex_buffer = self.win.make_texture_buffer(
            "overlay_buffer",
            2048, 512,  # the UV layout is not square in this example
            overlay,
            fbp=props
        )

        tex_buffer.clear_color = (1., 1., 1., 0.)
        cam = self.make_camera(tex_buffer)
        cam.reparent_to(uv_space)
        cam.set_pos(.5, -10., .5)
        node = cam.node()
        lens = OrthographicLens()
        lens.film_size = 1.
        node.set_lens(lens)

        # start a task that increments the counters
        self.task_mgr.do_method_later(.1, self.__count, "count")

    def __count(self, task):

        counters = self.counters
        text_nps = self.text_nps

        for side in ("front", "back", "left", "right"):
            counters[side] += 1
            text_nps[side].node().text = self.text + f" {side}: {counters[side]}"

        return task.again


app = MyApp()
app.run()
Note that if you have many cubes that need to be updated simultaneously, then this won’t be very efficient. Otherwise you might want to give it a try.
