This isn’t exactly a showcase, but a guide to building the WebGL port of Panda3D and setting it up for static linking with your own C++ application. A lot of the information in this guide can also be found in rdb’s Panda3D on WebGL instructions, but this guide shows the setup process without the need of the freezify.py file that rdb has built to automate setting up Python, certain compiler / linker flags, and boilerplate C code that is required to get Panda running on the browser. Here’s your guide, @Simulan ![]()
As of June 2023, WebGL support isn’t available in the current release of Panda as it’s not ready for release, so we will be using the webgl-port branch of Panda3D. This also means that we’ll have to build Panda3D ourselves as there is no binary released.
Setting Up
The instructions assume you are on a Linux based or UNIX-like operating system (such as MacOS).
Requirements
- Git VCS
- GNU Make
- CMake
- Python 3 (for running makepanda.py)
- Emscripten SDK
You will need to install the Emscripten SDK on your system to build Panda3D with WebGL support. Emscripten is a complete open-source compiler tool chain for applications targeting WebAssembly. You can find the download instructions for emsdk here.
# Get the emsdk repo
git clone https://github.com/emscripten-core/emsdk.git
cd emsdk
git pull

# Download and install the latest SDK tools.
./emsdk install latest

# Make the "latest" SDK "active" for the current user. (writes .emscripten file)
./emsdk activate latest

# Activate PATH and other environment variables in the current terminal
source ./emsdk_env.sh
NOTE: It is important that you run the emsdk_env.sh bash script (or .bat if you’re on Windows), as this sets the PATH environment variable to include the binaries in the emsdk tool chain, such as the compiler and other utilities.
Now that you have the tool chain set up, you will also need to download the Panda3D repository to compile the engine with Emscripten. (You can clone the repository in any directory you’d like)
git clone -b webgl-port https://github.com/panda3d/panda3d.git panda3d-webgl
cd panda3d-webgl
The clone command above should already checkout the webgl-port git branch for you.
The following requirement is optional, as we won’t be using these files but I will be referencing a freezify.py file as it contains some boilerplate code that we will use to compile our program.
# In the 'panda3d-webgl' directory
wget https://rdb.name/webgl-editor-and-dependencies.zip
unzip webgl-editor-and-dependencies.zip
Building Panda from source
Before jumping into the following step, I would like to mention that we will be building Panda into static libraries, instead of dynamic libraries. Later in the guide (once we set up our C++ program that uses Panda), we will statically link our program with the Panda libraries into a single WebAssembly (or .wasm) binary.
In rdb’s instructions, he recommends building Panda with dependencies such as vorbis, freetype, harfbuzz, etc. We will be building Panda with those dependencies. The recommended dependencies you would like to build Panda with are up to you. Later in the guide we will tell Emscripten to pull these dependencies from emscripten-ports through linker flags.
We’ll now build the engine with release optimizations just as we usually would with the following flags, as shown in the command below:
python3 makepanda/makepanda.py --nothing --no-png --use-zlib --use-vorbis --use-freetype --use-harfbuzz --use-openal --use-direct --use-gles2 --optimize 4 --static --target emscripten --threads 4
NOTE: You can see rdb’s original instructions for the full list of flags.
This process should take around 5 - 10 minutes, depending on your computer’s processing power.
Once the engine is compiled, all of the generated binary and headers should be in the built/ directory.
Setting up your C++ program
Your C++ Panda3D application will be using the static libraries and C++ headers that you just generated. You can find the static libraries (.a files if on Linux, .lib on Windows) inside the built/lib/ directory. The C++ header files should have been generated inside the built/include/ directory.
Since WebAssembly programs don’t run on your system freely but rather inside a sandboxed virtual machine, there are certain restrictions (such as accessing the file system, network protocols, etc.) Because of this, the Esmcripten tool chain does not use C / C++ libraries or headers installed on your system. (You can still use the standard C / C++ headers though)
You will need to explicitly tell the Emscripten em++ compiler to find the libraries or headers in a specific location, which you may choose. (you can move the entire built/include directory into a separate directory in your project or just use the path of the directory where they were generated.) What I did was copy the include directory over to a new directory at /usr/local/include/panda3d-webgl/.
cp -r ./built/include/* /usr/local/include/panda3d-webgl
NOTE: The following steps assume you’ve set up your own C++ project with Emscripten (main C++ source file, CMakeLists.txt, etc.) You can read the tutorials at the Emscripten website for more information. If you’re using CMake, make sure to generate your CMake project using the emcmake utility from the Emscripten SDK. This tool sets the required environment variables for using the tool chain.
I’ve also copied over the built/lib directory with the Panda static libraries into the same directory my C++ program’s source files are located in.
cp -r ./built/lib* <your project directory>
You can choose what location you would like to put the libraries in, but for this example I will assume they are located in the same directory as your source code.
Your project should now have all the resources required to compile with Panda3D. Now we have to make sure we configure our build system to statically link with Panda, include the headers, and set the certain Emscripten compiler and linker flags needed for Panda to run.
The following is a snippet from my CMakeLists.txt file. It includes the compiler and linker flags that rdb’s freezify.py files use. (used to compile the webgl samples) Your configuration may vary depending on how you set up your project and any other needs you may have. ![]()
# Static libraries (.a / .lib) should be in the source directory.
set(CMAKE_EXE_LINKER_FLAGS "${CMAKE_EXE_LINKER_FLAGS} -L${CMAKE_CURRENT_SOURCE_DIR}")

# Assuming you built Panda with the following modules. (includes direct)
set(CMAKE_EXE_LINKER_FLAGS "${CMAKE_EXE_LINKER_FLAGS} -lz -lpanda -lpandaexpress \
    -lp3dtool -lp3dtoolconfig -lp3webgldisplay -lp3framework -lp3openal_audio -lp3interrogatedb -lp3direct")

# Have Emscripten pull the following panda dependencies from emscripten-ports
set(CMAKE_EXE_LINKER_FLAGS "${CMAKE_EXE_LINKER_FLAGS} -s USE_ZLIB=1 \
    -s USE_VORBIS=1 -s USE_HARFBUZZ=1 -s USE_FREETYPE=1 -s USE_LIBPNG=1")

# Find the header files at /usr/local/include. Also set same compiler flags as freezify.py does.
set(CMAKE_CXX_FLAGS "${CMAKE_CXX_FLAGS} -I/usr/local/include/ -fno-exceptions -fno-rtti")

# Additional linker flags as used in 'freezify.py' from rdb's panda webgl samples
set(CMAKE_EXE_LINKER_FLAGS "${CMAKE_EXE_LINKER_FLAGS} -s MAX_WEBGL_VERSION=2 -s NO_EXIT_RUNTIME=1 \
    -s ERROR_ON_UNDEFINED_SYMBOLS=0 -s DISABLE_EXCEPTION_THROWING=0 -s ALLOW_MEMORY_GROWTH -fno-exceptions -fno-rtti")
Example Panda C++ Code
#ifdef __EMSCRIPTEN__
#include <emscripten.h>
#endif
#include <panda3d-webgl/pandaFramework.h>
#include <panda3d-webgl/pandaSystem.h>
#include <panda3d-webgl/genericAsyncTask.h>
#include <panda3d-webgl/asyncTaskManager.h>
#include <panda3d-webgl/cardMaker.h>
#include <panda3d-webgl/pandaNode.h>
#include <panda3d-webgl/nodePath.h>
int main(int argc, char* argv[])
{
// Initialize Panda libraries
// (these functions are called in freezify.py's boilerplate C code)
init_libOpenALAudio();
init_libpnmimagetypes();
init_libwebgldisplay();
// Open a new window framework
PandaFramework framework;
framework.open_framework(argc, argv);
WindowFramework *window = framework.open_window();
window->enable_keyboard(); // Enable keyboard detection
window->setup_trackball(); // Enable default camera movement
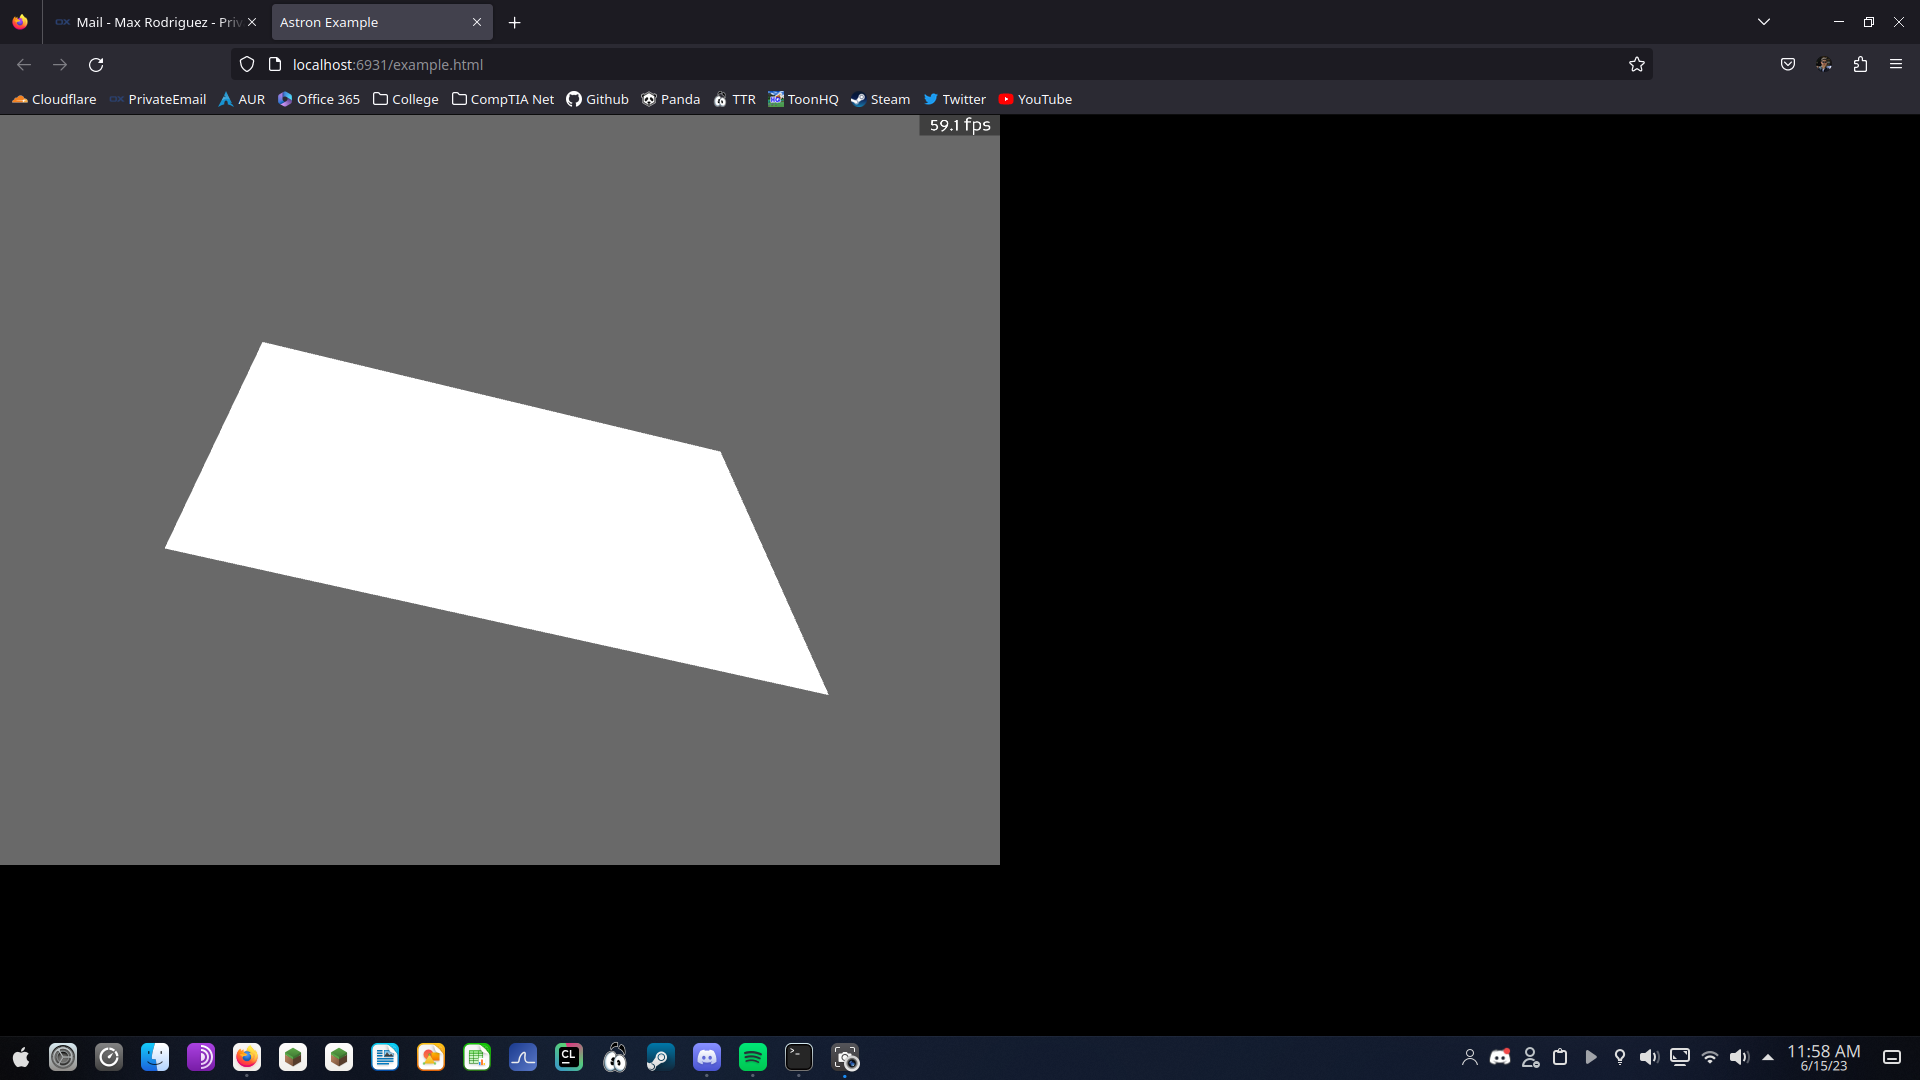
// create a square quad to view some geometry
CardMaker quad = CardMaker("quad");
quad.set_frame_fullscreen_quad(); // equivalent to square quad in render
PT(PandaNode) quad_node = quad.generate();
// make a nodepath object for the quad to parent to render
NodePath quad_np = NodePath(quad_node);
quad_np.reparent_to(window->get_render());
// start the framework main loop
framework.main_loop();
framework.close_framework();
return 0;
}
NOTE: As of June 2023, setting the graphics window clear buffer color doesn’t work in the WebGL pipeline, which is why we create a quad instead to view a canvas that isn’t just a black screen. ![]()