Cartoon shader improvements

Recently, I had some ideas for improving the cartoon shader, as mentioned here:

I now have a working prototype. What I’ve added is:

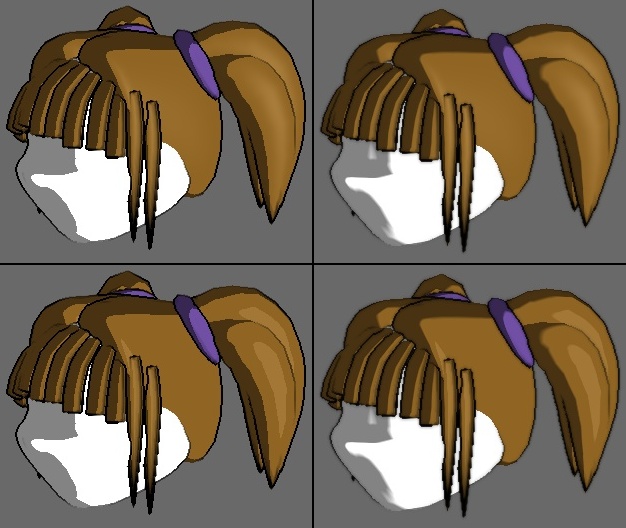
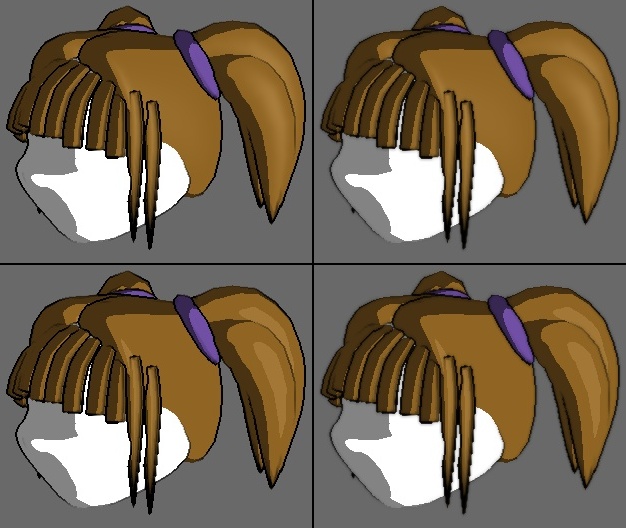
  • Smoothed light/dark boundaries in light ramping. In addition to sharp thresholding as previously, a linearly interpolated transition is now supported in both single and double threshold modes. The length of the interpolation range can be adjusted (separately for both transitions in double threshold mode). This exploits the continuity of lighting values on smooth surfaces, and is not the proper way to antialias the boundaries under arbitrary circumstances, but in practice it seems to give satisfactory results (at least in my tests).

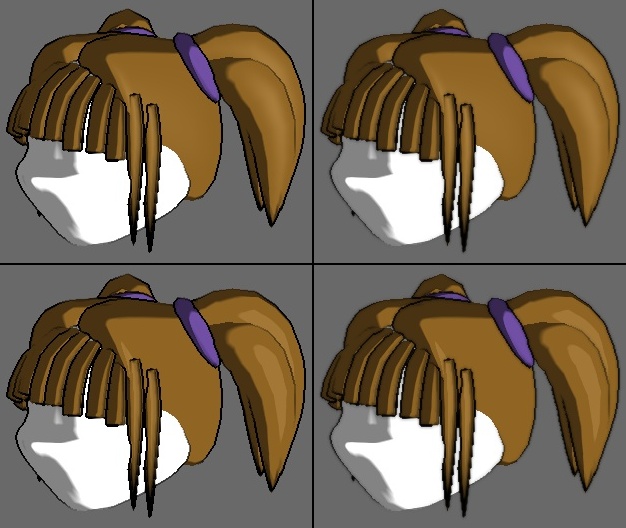
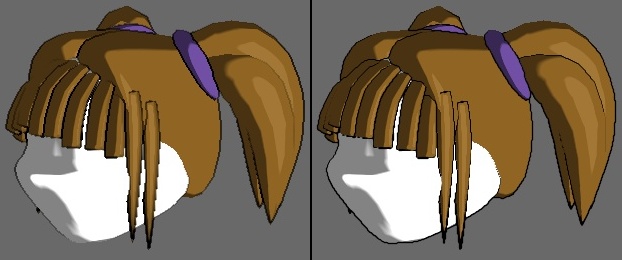
  • Light ramping now optionally affects the specular lighting contribution, too. The threshold/level/smoothing parameters for the specular component can be adjusted separately. New versions of make_single_threshold() and make_double_threshold() have been added to accommodate this. This feature is mainly useful for anime style hair.

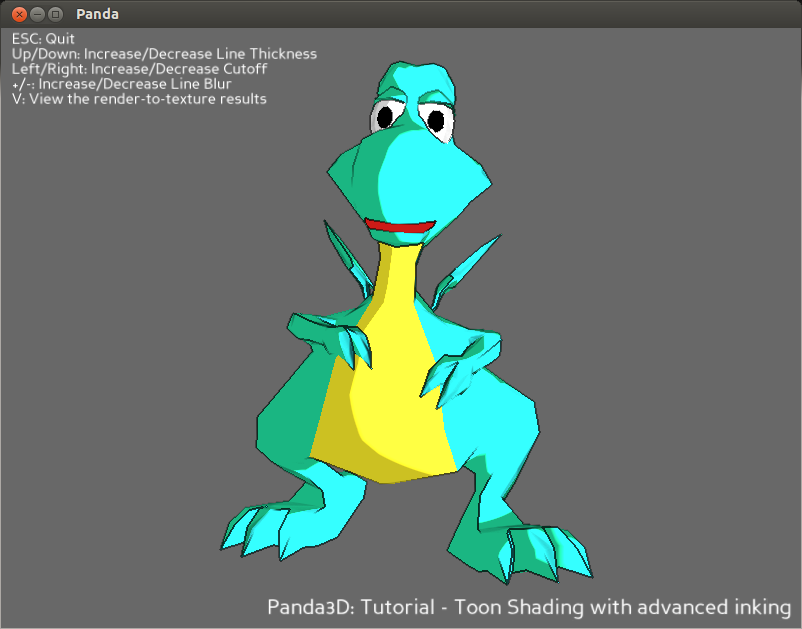
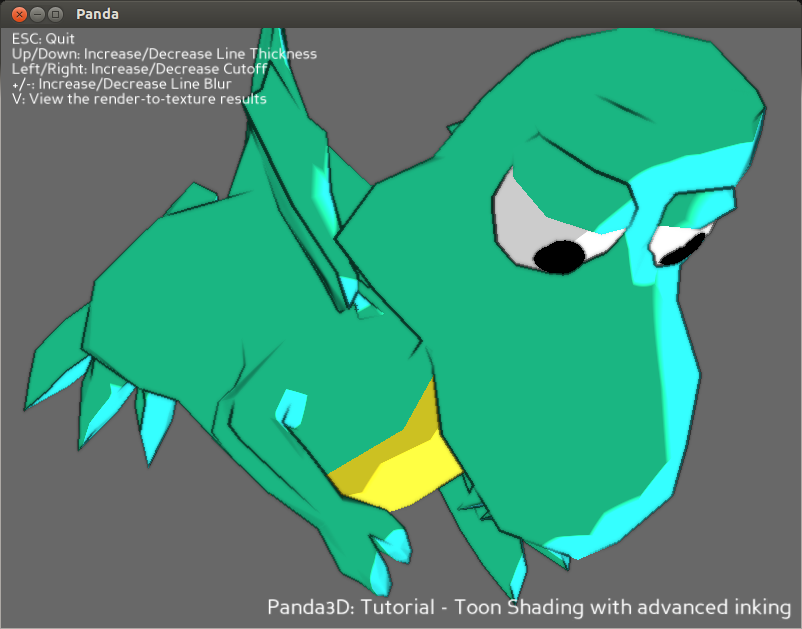
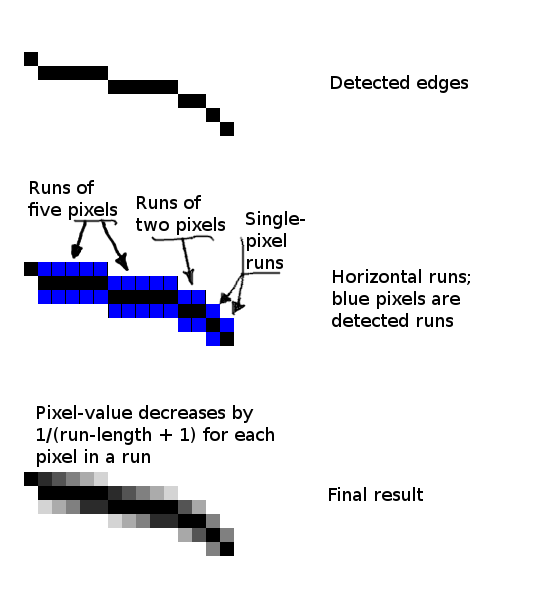
  • An “advanced ink” filter has been added to CommonFilters.py. It is based on the existing inker, but it has some new features. It accounts for the distance of each pixel from the camera (nearer = larger separation parameter → thicker line), smooths the lines using a blur filter, and optionally the inking can be rendered into a double-sized buffer to reduce artifacts at nearly horizontal or vertical edges. (This last solution is not completely satisfactory, so I’m not sure yet whether to keep that feature or not.)

  • The “cutoff” parameter of Tut-Cartoon-Advanced.py is now integrated into the inker in CommonFIlters.py. It wasn’t many lines, and I found it odd that this potentially useful feature was missing. :slight_smile:

Also, I’ve fixed the two bugs I found:

At this point, I have some questions:

  • Are you guys interested in all/some/any of these changes? If some of these changes are considered potentially useful to other Panda3D users, I would like to work toward getting them integrated in the official source.

  • What is the proper protocol for posting source code? Attach a patch here?

  • In case there is interest, what is the procedure for code review?

  • Is there a way to post pictures? I’d like to share some images highlighting the modifications.

Sounds useful! I’d be happy to review and check in your patches, provided that they are backward compatible and they adhere to the Panda coding style. You can use any mechanism you like for submitting patches; a bug report is probably most useful because of the commenting and tracking interface.

I’d love to see some images; you can use the attachment feature of the forums to attach pictures and they will be embedded automatically.

Thanks for the info. The current code is now posted as a patch against 1.8.1 in the bug tracker:

bugs.launchpad.net/panda3d/+bug/1221546

Some of my own thoughts on the current state of the patch:

As mentioned in the original post, I’m not completely satisfied with the double resolution inking, so I’m still debating whether to keep that feature or not. Aside from hardly being a clean solution (and not completely getting rid of artifacts), I haven’t yet been able to get the parameters to respond in a visually identical way between the two resolution modes, which would be required to make this option visually independent from the others.

Currently, the blurring (ink line smoothing) of advanced_ink is incompatible with BlurSharpen, because it uses the same blur buffers to render the blur. I have chosen this route, because if I’ve understood correctly, there is a hardware-dependent limit on the number of supported TEXCOORDn parameters. Since the current “main” shader of CommonFilters (the generated one, rendering to finalQuad) already uses up to 5 (0…4), I didn’t want to bump the number used to 7.

A general solution would be to either reuse the current buffers or use separate ones, depending on whether both advanced_ink and BlurSharpen are enabled at the same time. This would enable both to work at the same time if enough buffers are available. But then the logic becomes more complicated, which increases the risk of bugs and makes future maintenance harder.

But wait? Maybe an even more general, and much simpler, solution would be to keep a list of allocated TEXCOORDns, and assign them dynamically to the different parameters of the shader when the full rebuild runs. This would keep their allocation optimal, and would be easy to implement in Python. It seems the only bookkeeping required is to match the TEXCOORDn numbers between the generated vshader and fshader. I could do this if it’s useful?

As for the other stuff in the improvements, I think it is pretty much feature-complete, but of course feedback is welcome.

Usage examples are still missing, as I’ve been testing this using a short test program of my own (related to the project I’m building). For the final version, I could prepare a cleaned-up “advanced basic” tutorial demonstrating how to use the added features.

Finally, I have one further idea that I haven’t tested yet, which I might still add before a final version. I’m thinking that the light/dark boundaries could be smoothed by a postprocessing pass, instead of smoothing them in lighting space like the currently proposed patch does. The lighting space smoothing has its uses however, and would be kept as a separate feature.

(For example, the Toon shader in Blender has separate diffuse/specular controls, and smoothing parameters for each. The current patch pretty much implements that for Panda. Blender’s “size” corresponds to the threshold value (larger size = lower threshold), and “smooth” to the smoothing value.)

For this purpose, I’m thinking of introducing another blur filter that detects pixels which have no normal map discontinuities, and blurs only those. What would happen, theoretically, is that in an area with a constant lighting value (generated by the light ramping), the result is a no-op, while on the light/dark boundaries applying a blur will smooth the boundary.

This would slightly blur the textures, but that is unavoidable in this approach. Objects shouldn’t bleed, because their outlines usually have a normal map discontinuity with whatever is behind them. The only case where this approach obviously fails is when a light/dark boundary is aligned with an edge in the mesh. I’ll need to test this to see how common that is.

Sounds great! It’s indeed a good idea to have a small function that returns a TEXCOORD$ semantic that hasn’t been used yet, so that it uses consecutive registers regardless of which filters are enabled.

Ok, I’ll add this to the patch.

In the meantime, here are some images.


Sharp inking with no blur, for comparison.


Smoothed inking with smoothing parameter set to 0.5.


Depth-dependent inking (thicker line near camera).

EDIT: new screenshots showing more clearly what the patch does.

This is for a character builder I’m working on. The hair is procedurally animated using a custom physics simulation (see later post).

Here is an array for visual comparison, in 1:1 size to show artifacts clearly.

Upper left (reference): autoshader toon shading from vanilla 1.8.1
Upper right: smoothing of outlines and light-to-dark transitions enabled
Lower left: specular quantization enabled
Lower right: both smoothing and specular quantization enabled


The outline and light-to-dark transition smoothing options can be controlled separately. Same layout again, but with light-to-dark transition smoothing disabled:


Again, but now all four rendered with light-to-dark transition smoothing enabled:


The parameters are as follows. Lighting:

thresh0=0.55
lev0=0.8
smooth0=0.03
affect_specular=True
thresh0_specular=0.5
lev0_specular=0.8
smooth0_specular=0.03

Inking:

separation=1.2
cutoff=0.5
color=(0,0,0,1.0)
use_advanced_ink=True
blur_amount=0.5
depth_enabled=True

Tested. This idea was in fact useless.

It didn’t work, because when viewed from far away, e.g. a character’s face might no longer have sharp edges, so it gets all blurred. Also, objects may actually bleed a bit, because both the pixel inside the object boundary and its neighbor outside it trigger the edge detector. For inking, this doesn’t matter, but for blurring…

Thresholding parameters could be added, like for inking, but I think that smoothing of the light/dark boundaries shouldn’t require that much careful tweaking from the user. The lighting space approach is cleaner in at least two ways - the smoothing range is a more transparent parameter to configure, and that approach doesn’t require a postprocessing filter (leaving more buffers and registers for other filters).

I’ve also added the TEXCOORDn allocator thingy, and now any combination of filters can be enabled at the same time (as long as the hardware has enough registers).

An updated patch will follow shortly.

Patch updated. New version in bug tracker.

As mentioned in passing concerning the new screenshots, the custom hair simulation code is now working.

See thread with screenshots here: viewtopic.php?f=9&t=17208

Ping for code review or any comments from the community.

Cartoon shader improvements:
bugs.launchpad.net/panda3d/+bug/1221546

Bugfixes related to cartoon shading:
bugs.launchpad.net/panda3d/+bug/1214782
bugs.launchpad.net/panda3d/+bug/1219422

Please observe also that with both diffuse and specular quantized, the lighting obtains three “levels” like discussed (in 2010) by Anon and ninth in More on cartoon shading... even when a single threshold light ramp is used. Three levels can be obtained also by using a double threshold light ramp on the diffuse component only, but the visual styles produced by these two approaches are different.

Just letting you know I certainly haven’t forgotten about this. It’s on my list of things to look at before the 1.9.0 release.

Ok. Thanks :slight_smile:

Is there an approximate timeframe for 1.9.0?

Namely, there are a couple more things I’d be interested in fixing/adding, if I have the time:

  1. Some last-minute fixes to the cartoon shader. There is still something funky going on with the inking, as can be seen in the screenshots.
  • The alpha gradient in the outline of the side bangs, in places where they are rendered in front of the head, looks as if shaded backwards (causing visibly jaggy edges). I didn’t change the normal map based edge detection logic, and indeed, the artifact is visible both in the original and improved versions.
  • The detector doesn’t seem to like rendering horizontal edges at those places where the object’s outline meets the default background (empty space), although edges with a significant vertical component (when viewed in the screen plane) render just fine.

Under most circumstances, the edge detector seems to work correctly, so this may be a shortcoming of the algorithm. But I need to investigate this to be sure.

  1. Character hair physics simulation, if deemed useful enough to include into Panda. At least one other community member is interested in having such functionality.

This one must be ported to a C or C++ extension and slightly expanded before it becomes practically useful. An initial usable version will probably take a few days of coding, depending on how easy or difficult it is to add new modules to the Panda build system. (I’ve had a look at your comments in https://discourse.panda3d.org/t/c-extensions/3098/1], the manual [url]https://www.panda3d.org/manual/index.php/Interrogate, and the skel example that comes with the Panda sources - but haven’t yet had time to try creating my own module.)

  1. I think it would be interesting to integrate ninth’s procedural lens flare filter ( [url]Lens flare postprocess filter] ) into CommonFilters. The updated logic in the cartoon shader patch should make the integration slightly easier. The filter looks spectacular, requires no special setup for the scene, and at least I think it would make an especially nice addition to the standard filter set. (It goes well with bloom, as both are psychovisual tricks intended to increase the perceived dynamic range.)

I’m trying to release it this month, but given the amount of work, it might bleed into next month. That means there’s not much room for big new features, but there is for bug fixes. If you know more information about any of the bugs you mentioned, please post it in the bug tracker.

The lens flare effect looks cool. If someone finds a way to integrate this into CommonFilters.py, I’d be happy to ship it. Have you asked ninth about the license it is under, and/or whether or not we’d be allowed to include it as part of Panda?

As for hair simulation: it sounds a bit specific to be included in a general-purpose library like Panda, but if the extension is well-written and if it’s interesting to enough people for it to be of general use, I’d be happy to include it as a contributed module.

Looking at the screenshots, I’m not sure that the outline-smoothing is an improvement: to my eye the steps of the original jagged outline are still rather visible, and the blurring seems to largely have the effect of making the outlines fuzzy.

(I’m sorry to say that I don’t have a better option to suggest, however. I’m far from an expert in graphics techniques, and while I’ve been thinking on-and-off about something similar the only option that I’ve come up with is supersampling, which seems likely to be expensive. :/)

That said, I do rather like the specular quantisation and the light-to-dark transition.

Ah, that soon!

At the moment I don’t have any more information, but I’ll return to this after I investigate a bit.

I’ve looked at the code and I think it shouldn’t be that hard to integrate. The tricky part is figuring out any interactions with other filters. But I can look at this some time in the near future, as this is a feature that I’d like to have.

Not yet. Reading the thread, it seems he was fairly liberal about it, but you’re right that we have to ask first. I’ll do that.

Ok.

In a way, it is indeed specific considering the spectrum of things a general 3D library can do, but on the other hand, I think modelling human characters is a fairly common task in game development.

Even in big-budget games, to my knowledge properly animated long hair seems to be a rather new phenomenon, and is still rather rare. Off the top of my head, I can think of Sophie’s ponytails from Tales of Graces f (2012), Esther’s braid from Ni no Kuni (2011/2013), and some of the hairstyles in LittleBigPlanet (both 1 (2008) and 2 (2011)), which is heavily physics-based, but that’s about it. Dragon’s Dogma (2012) tried with some shoulder-length hairstyles, but the simulation looked somehow off. If I recall correctly, the original Hitman’s tie was procedurally animated, but at that time (2000) the trend didn’t seem to catch on.

If the option to animate hair (pretty much) automatically is available, this gives greater freedom in character design, as the hairstyle question is no longer a question of a significant amount of additional programming.

So, that’s my reason for asking :slight_smile:

I’ll go ahead with implementing the C version for now.

Thanks for your input on all of the points!

I have to admit I’m not perfectly satisfied with it either.

However, maybe there’s also a component of taste. My eye tends to be drawn to sudden contrasts occurring over a single pixel - the kind of artifact that is produced when drawing lines without any antialiasing. I’m not so much disturbed by slight blur. The original version did not have any antialiasing, so it had the sudden contrast everywhere. The outline-smoothing version removes this artifact in most of the outlines drawn, at the cost of adding a blur to the outlines.

Granted, the jagged edges of the side bangs look horrible (as they did before any changes). I’ll have to re-check the code one more time to figure out what is going on in this particular case.

I did try double-resolution inking (and then downsampling the result) in an earlier version of the patch, but ended up discarding that, as it didn’t look any better. Going higher than double resolution probably makes no sense for a fullscreen texture.

The problem that prevents proper antialiasing is that the inking filter has no concept of a line: it simply colours pixels depending on local information only. It looks for discontinuities in the normal map (to my understanding this is a standard inking technique).

At each pixel, it first gathers the normal data at four points: (-dx, 0), (+dx, 0), (0, -dy) and (0, +dy) relative to the current pixel. Here dx = dy is the offset parameter. The differences between the smallest and largest values of the x and y components of this normal data are then summed and compared to a threshold. This produces a number, which in the original filter was used to switch the ink on or off (for that pixel). In the modified filter, the hard on/off has been changed to a linear interpolation (with saturation) - under the assumption that “less discontinuity” should mean a more translucent line.

The blur used for the outlines is a selective one, which only adds more ink to pixels (never removing existing ink). The intent is to simulate the antialiasing that would be applied while drawing a line, but without knowing there is a line. The drawback is that long horizontal or vertical line segments will bleed. This may contribute to the fuzzy appearance.

So, I don’t have a better solution either - ideas from the community are welcome :slight_smile:

Thanks!

And thanks for your input!

Hmm… Actually a kernel of a thought does come to mind, inspired by something that I saw elsewhere, but I’m not at all sure that it would work, or perform well.

The idea is to perform two passes of a form of edge detection: one detecticing vertical runs of “inked” pixels and one detecting horizontal runs. (If both can be done in a single pass then all the better.) The trick would be to determine directionality: if one could determine the “origin pixel” for the run–that is, the first “ink” pixel along the line of the run–then one could add “ink” pixels along the horizontal and vertical runs, fading along the length of the run.

Maybe some version of this would be worth a try. Would you happen to have any links, or pictures? I’m not sure I understood in which pixels the ink should be applied e.g. along a horizontal run.

The ink is rendered into a separate texture anyway, so it is easy to postprocess it separately.

Implementation-wise, this kind of algorithm sounds a bit tricky for the GPU. As you may know, the fragment shader program is a kernel that will be executed independently for each pixel in the output texture. Any pre-existing data fed in to the shader can be utilized in the computation, but ultimately the fragment shader must decide the output colour of each pixel independently, without knowledge of any other pixels being rendered in the same pass. This makes the computation “embarrassingly parallel”.

Maybe the best approach would after all be some kind of supersampling. Looking at what the inker would like to do, is somehow represent the location of the ink at a resolution higher than the target - i.e. subpixel rendering. From this perspective it is clear why it is difficult to smooth the lines in a postprocessing pass: the subpixel information is not present.

Which gives me an idea. It occurred to me just now that I haven’t yet tried doing supersampling properly, i.e. inside the inking algorithm. Instead of using the center of the pixel as the reference position for the offsets, we could repeat the calculation four times, using shifted positions that are off the center, some way toward each corner. Then we colour the pixel based on how many of these calculations returned that the pixel should be inked (using a hard on/off threshold in the subcalculations).

This is probably a better way to utilize subpixel information than simply doubling the resolution of the ink texture and downsampling. It still relies on linear interpolation of the 1x resolution normal map, so I’m not sure how well this will work. But at least it is worth a try.

(As I see it, the only practical way to get a higher-resolution normal map would be to render the whole scene at 2x resolution - which makes no sense in a realtime application.)

Subpixel inking tested. Result below. Specular quantization and light-to-dark smoothing enabled so that the only option that changes is the inking type.

Comments? Better or worse than the previous attempt? Update the patch to use this?

Left: vanilla 1.8.1 inking
Right: subpixel inking (with the same settings)


Observe the ponytail holder and the outermost outline. Note also changes in internal outlines between the ponytail bunches (at the right in the image) and the edgemost front bang at the left edge of the image.

Beside adding subpixel sampling, I also made two slight changes to the computation:

  • The original inker used only the first two components from the view normal map, while this version uses all three. This was the reason behind some of the missing outlines (note the chin).
  • The ink calculation now uses an internal half-pixel shift, using the center point of the pixel as the reference. This visibly improved the results especially for the problematic side bangs in the picture.

It’s obvious that the red channel represents x (and the scaling is 0…255 for -1.0…1.0), but I’m still not sure which way the green and blue channels in the aux texture map to the y (up/down) or the z (in/out) directions in the view space (and what is the possible range for z, since backward pointing faces are usually not rendered). This is something that could use more documentation. (I was trying to find out whether a component, and which one, needs to be weighted twice as much as the others. Currently they all use the same weight.)

As for the side bangs, they’re somewhat of a challenge to ink. The problem is that there simply is not much variation in the view space normal where the two surfaces meet. Maybe a more advanced version could use a separate texture to identify different objects or materials, and ink those outlines too. (This would require some nontrivial changes to the main shader generator.)

One more thing about the subpixel approach. To eliminate noise, the code uses a voting method, where at least any 3 of the 9 subsamples must decide to ink the pixel before any ink is applied. The amount of ink is then linearly interpolated from 3 votes = very translucent to 9 votes = replace pixel with specified cartoon inking color. This improved the output slightly (again, especially in the side bangs) when compared to an initial version which did not use voting.

I do think that it’s an improvement–at the least (as you point out) it inks edges that the previous version missed, and it lacks the blurriness of that version. There’s still some jagginess, but there are regions in which it’s softening the lines somewhat.

I hadn’t realised that you’re using the normals for your inking; the outlining that I’m doing at the moment is for a pencil-shader, and does pretty much what you seem to be suggesting: since I don’t care about the colour of the object for the final output, I give each object a unique colour, then render colour and normals. The normals are used for lighting and thus the actual pencil-shading (with a bit of contribution to the outlines), and the colour is used for edge-detection, with changes in sample colour identifying edges.

Here’s a quick mock-up of what I had in mind:


The result isn’t perfect: it lacks an understanding of the intention behind the edge, and the in the final image might be better with a small multiplier applied to the “run-length”, causing the pixel-value to fall off more quickly.

Indeed, this is the problem that I keep hitting, and a significant reason to doubt that my suggestion would likely work. :confused:

If there were some way of keeping state I do think that it could be made to work; moving the processing over to the CPU should enable that, but that seems likely to be very slow…

The only other thing that comes to mind is switching from a pixel-based approach to the inking to a geometry-based approach: before rendering, determine the “outline” edges and place cards (or a Meshdrawer-style trail) along them, drawing an appropriate texture along them.