Using simplepbr renders native blender geometry and textures black

I told you above that you can use one copy of the Material, of course you can also do TextureStage.

As for use_normal_maps, it can be used by models that you will create in the blender. However, if you will do without normal maps. Then yes, you can delete it.

You may want to configure SimplePBR.

I think it will be useful for performance.
For example, remove: use_emission_maps
And so on, everything that you do not need.

Yes, you mentioned that for the material. But that didn’t make it clear that it also accounts for the TextureStage OBJECTS, which might have been bound to the linked texture, as well. It wasn’t obvious from the example. Thanks for the clarification!

This is the whole concept of OOP.

from direct.showbase.ShowBase import ShowBase
from panda3d.core import DirectionalLight, TextureStage, Material

import simplepbr

class Game(ShowBase):
    def __init__(self):
        ShowBase.__init__(self)

        simplepbr.init(use_normal_maps=True)
        
        brik = Material("brick")

        texture_base_stage = TextureStage('base')
        texture_base_stage.setMode(TextureStage.MModulate)

        texture_base_1 = loader.loadTexture("models/maps/envir-ground.jpg")
        texture_base_2 = loader.loadTexture("models/maps/envir-rock2.jpg")
        texture_base_3 = loader.loadTexture("models/maps/panda-model.jpg")

        box = loader.loadModel("box")
        box.reparentTo(render)
        box.setMaterial(brik)
        box.setTexture(texture_base_stage, texture_base_1, 1)

        panda = loader.loadModel("panda")
        panda.reparentTo(render)
        panda.setMaterial(brik)
        panda.setTexture(texture_base_stage, texture_base_2, 1)

        ripple = loader.loadModel("ripple")
        ripple.reparentTo(render)
        ripple.setMaterial(brik)
        ripple.setTexture(texture_base_stage, texture_base_3, 1)

        light = DirectionalLight("mew")
        light.setColor((1, 1, 1, 1))
        lightNP = render.attachNewNode(light)
        lightNP.setHpr(5, -5, 0)
        render.setLight(lightNP)

app = Game()
app.run()

Everything, of course, is loudly said, but at least the foundation.

Many thanks for the great example script. It is very helpful and I feel we are very close.
My only remaining problem is that the geometry looks somewhat darkened. With the heightmap of my initial post, the result looks like this, now:

And even with a completely white image of the same size and a direct light of color (1, 1, 1, 1) from directly above, I only get this brightness:

Is that normal and all I can get from a directly lit white surface? I can overpower the light, but risk to alter the colors, as described in a parallel thread.

In fact, the light is partially absorbed by the material. You can make it as strong as you want, for example.
light.setColor((10, 10, 10, 1))

That’s what I meant by “overpower the light”.
And what I meant by “risk to alter the colors” is that rdb warned about using this (at least with the normal renderer!), because colors may become desaturated.

For example, when I use direct light (5, 0.5, 0.5, 0.5, 1) on this geometry and use the normal renderer (w/o simplepbr), then the surface is completely red. But when I boost it to (20, 2, 2, 1), then the whole surface becomes completely white, not completely red. With dlight setting of (10, 1, 1, 1), the most intense areas already become white:

I couldn’t see that harsh effect when using the simplepbr shader. But does that really mean that the simplepbr shader can cope with that boosted light? For example by logarithmically approaching 100%, like the filmic view transform in Blender? That would be nice.

One option is to boost the ambient light value directly in the shader, which can approximate Global Illumination, I believe.

Who told you that you need to increase the three RGB components exactly like this?

(10, 1, 1, 1)

They should be the same. Otherwise, some component will dominate.

(10, 10, 10, 1)

Yes, simplepbr uses HDR and it can therefore handle bright lights. Feel free to use realistically bright values for lights. Use the exposure value in simplepbr to tune the final result.

The whitening effect (loss of colour) when a light’s value is increased is part of the HDR tonemapping, it simulates the same effect as seen by a film camera.

1 Like

Not only the camera can see the loss of color in bright light. This is seen by the eye, for example, a glare is always the same color, regardless of what color the object threw it when bright light hits the surface.

My understanding of lighting told me so. When I want to show that a geometry is rendered fully saturated at a low value and becomes desaturated at a higher value, and I reuse a non-colored texture, then I have to use colored light to make it appear red.

That’s exactly the point. Making all the same value, will result in a non-saturated light, making it impossible to show a desaturation-effect on a greyscale texture. :slight_smile:

Yes, it really looks like the contrast range has increased (using simplepbr), therefore reducing the local contrast, but opening the range towards the bright end.
The hint for the exposure value of simplepbr’s init was exactly what I was looking for, I guess. Thank you!

In the human eye’s perception, this whitening effect is caused when the receptors are excited at their limit, but they would slowly reach their limit (and you can wear mono-chromatic filters to get the intension down to viewable ranges, even for glares). The problem is the extremely uneven effect when using the normal renderer, compared to a more even effect using simplepbr. As rdb confirmed, it is a continuous effect thanks to HDR rendering.

Thank you all for the clarification! Especially you for the kind summary of the example on TextureStage usage! I really apreciate it and I’m sure it will be a helpful reference for other users!

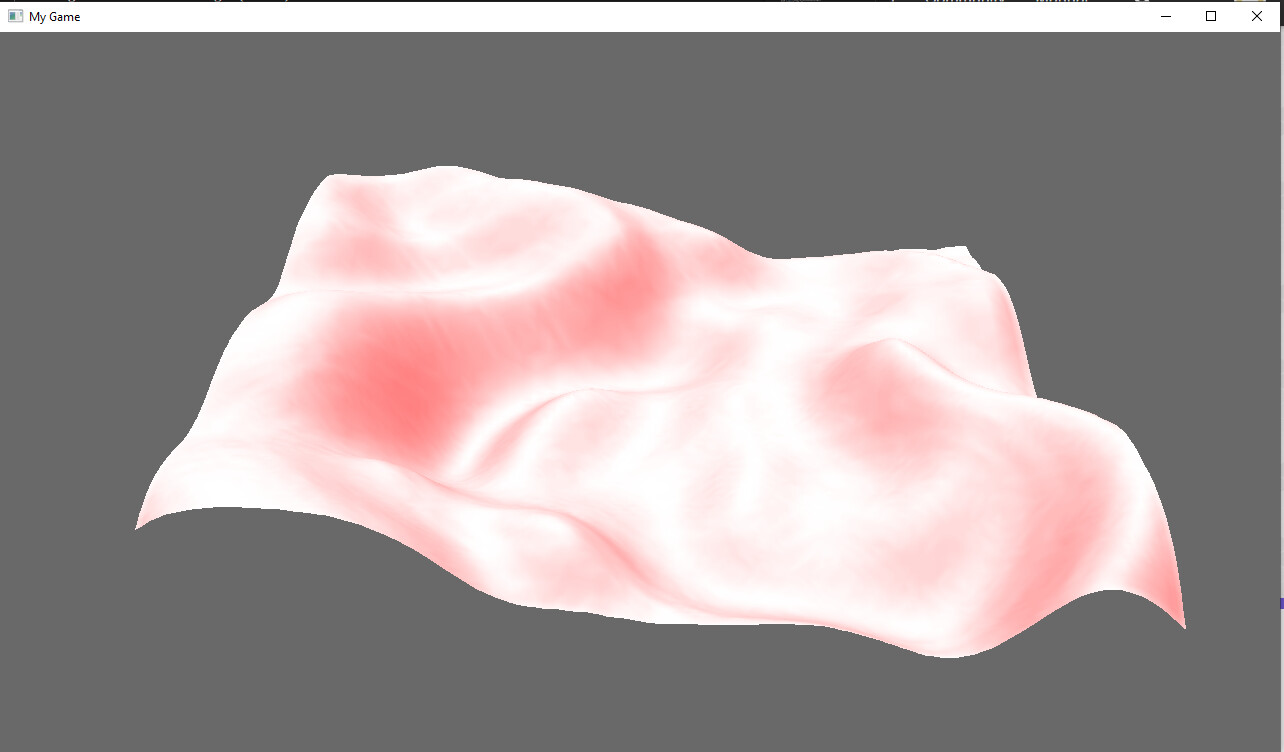
There is another way to make the color saturated, this works in the standard panda render and SimplePBR.

Instead of raising the light intensity, you can change the color of the object, here is an example with a material.

from direct.showbase.ShowBase import ShowBase
from panda3d.core import DirectionalLight, Material

import simplepbr

class Game(ShowBase):
    def __init__(self):
        ShowBase.__init__(self)

        #simplepbr.init()

        multiplier_color = 10

        material = Material("brick")
        material.setBaseColor((1*multiplier_color, 0*multiplier_color, 1*multiplier_color, 1))

        ripple = loader.loadModel("ripple")
        ripple.reparentTo(render)
        ripple.setHpr(0, -90, 0)
        ripple.setMaterial(material)
        ripple.setTextureOff(1)

        light = DirectionalLight("mew")
        #light.show_frustum()
        light.setColor((1, 1, 1, 1))
        lightNP = render.attachNewNode(light)
        lightNP.setHpr(0, -90, 0)
        render.setLight(lightNP)

app = Game()
app.run()

In fact, I did not mean the same value, but the increase in all three components is proportional.

The method can be used if you even have a texture.

setColorScale()

from direct.showbase.ShowBase import ShowBase
from panda3d.core import DirectionalLight, Material, TextureStage

import simplepbr

class Game(ShowBase):
    def __init__(self):
        ShowBase.__init__(self)

        #simplepbr.init()

        material = Material("brick")

        texture_base_1 = loader.loadTexture("white.png")

        texture_base_stage = TextureStage('base')
        texture_base_stage.setMode(TextureStage.MModulate)

        ripple = loader.loadModel("ripple")
        ripple.setTextureOff(1)
        ripple.reparentTo(render)
        ripple.setHpr(0, -90, 0)
        ripple.setColorScale((10, 10, 10, 1))
        ripple.setMaterial(material)
        ripple.setTexture(texture_base_stage, texture_base_1, 1)

        light = DirectionalLight("mew")
        #light.show_frustum()
        light.setColor((0.2, 0.2, 0.2, 1))
        lightNP = render.attachNewNode(light)
        lightNP.setHpr(0, -90, 0)
        render.setLight(lightNP)

app = Game()
app.run()
1 Like

As a heads up, I have released simplepbr v0.9, which makes use of the mode-based texture inputs added in Panda3D 1.10.8. This means that:

  • Texture order is no longer important; just make sure to set the correct texture mode for each texture
  • Fallback textures are automatically generated with sane default values when a texture with the appropriate mode is not present.
5 Likes