BASIC RENDER LAYERING AND MASKING EFFECT
Here is a way to produce the effect described in the original post. The concept of it was explained by @rdb in this post.
WHAT IS THE GOAL?
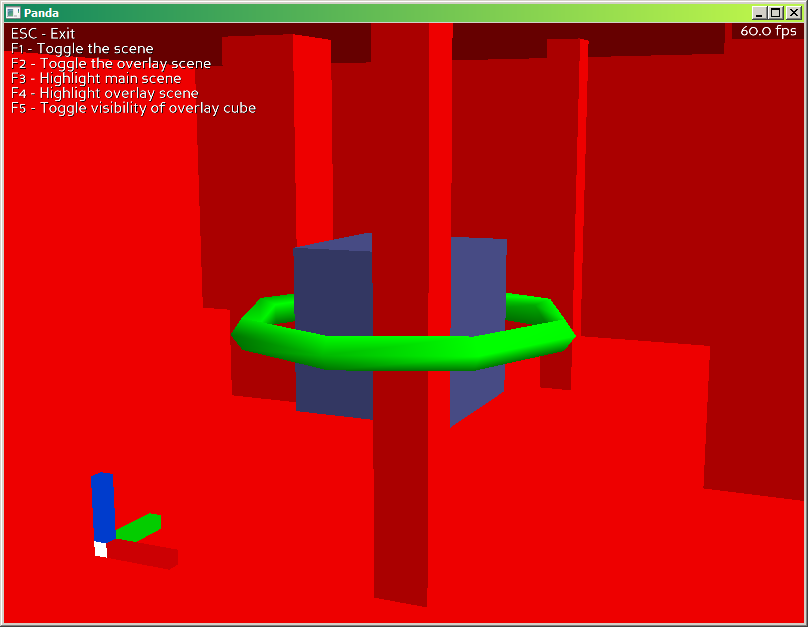
We want to produce the illusion that some models (the ‘overlay’, or ‘overlay models’; e.g. the green torus in this screenshot) will always render in front of everything else (the red room and pillars), except for one or more select models (the dark blue cube in the center).
These select models will occlude or be occluded, fully or partially, by the overlay, according to their depth. In other words, the overlay and the select models render against each other as normal.
This produces an interesting effect when the select models are occluded by non-select models: the parts of the overlay that would be occluded by the select models will be transparent, producing a cut-out effect in the shape of the select model.
ONE WAY TO DO IT
The technique is simple in theory: To produce the illusion that only some select models can occlude the overlay, we create duplicates of these select models and set them to be transparent, but still be capable of occluding the overlay. The duplicates are necessary because the overlay is rendered in a separate display region.
In practice, it requires a number of steps.
To make this work, we first separate the overlay and the duplicates from everything else. Depending on your intentions, and how you wish the overlay models to interact with the rest, you might have to figure out a specific hierarchy.
For the sake of this example, we separate each group into its own ‘scene’ (i.e. an orphan NodePath to which they are directly or indirectly parented, and containing its own camera. ‘base.render’ would be an example of a scene, as provided by default)
We now have:
-
‘main scene’, containing select and non-select models. It is rendered into a first display region by it’s own camera
-
‘overlay scene’, containing the overlay models and the duplicates. It is rendered into a second display region, by a second camera.
After creating the camera, pass the pos and hpr values of the first camera to the second camera, so that they have identical position and orientation. This should also be true for select objects and their duplicates, so if you have moved the select objects after creating their duplicates with “.copyTo()”, you will also have to pass on their pos and hpr to the duplicates.
This is done via object_b.setPos(parent_b, object_a.getPos(parent_a)); the same goes with ‘.getHpr’ and ‘.setHpr’.
If the cameras and objects are supposed to move during runtime, you can leave the paragraph above out for now, and write a continuous task that will pass on pos and hpr from the first camera to the second, and from select objects to duplicates every tick.
You also have to ensure both camera lenses have the same settings. This can be achieved by getting the lens node of the first camera, and callin ‘.setLens(lens)’ on the second camera.
After this, we might first need to sort our display regions. The overlay display region needs to have a higher sort value than the main display region. The default of 0 would work due to a kink of how Panda3D operates, but for the sake of clarity and preventing unexpected issues later, it is best to change it. Set the sort value with ‘.setSort()’.
Second, we set the overlay display region to ‘.setClearDepthActive(True)’. This ensures that Panda3D will clear all data from the main scene still in the depth buffer before rendering the overlay. Doing this might not be necessary if a previous display region (‘previous’ in terms of of sorting) already has that setting and uses a different part of the window than your overlay does.
Thirdly, we need to place the models in the overlay scene into the ‘fixed’ bin and give them appropriate sort values. You need to give the duplicates of the select models a higher sort value than the overlay models. This ensures the duplicates will write their depth data into the buffer before the overlay models are rendered. That way, the overlay models can be fully or partially occluded by the duplicates. To do this use setBin(‘fixed’, v), where ‘v’ is your sort value, for each object.
Finally, we need to give all the duplicates a rendering attribute which tells Panda3D to render them transparently. To do this, pass .setAttrib(ColorWriteAttrib.make(ColorWriteAttrib.C_off)) onto each duplicate model. With this attribute, the objects’ colours will not be rendered, but they will still provide depth data so that the overlay models can be occluded by them.
And now, the desired effect should be achieved. If not, review the steps and see whether you have not skipped anything. You can also compare your code with the example file below.
Render_Layering_Example.zip (13.5 KB)