Multitexture problems with procedural geometry

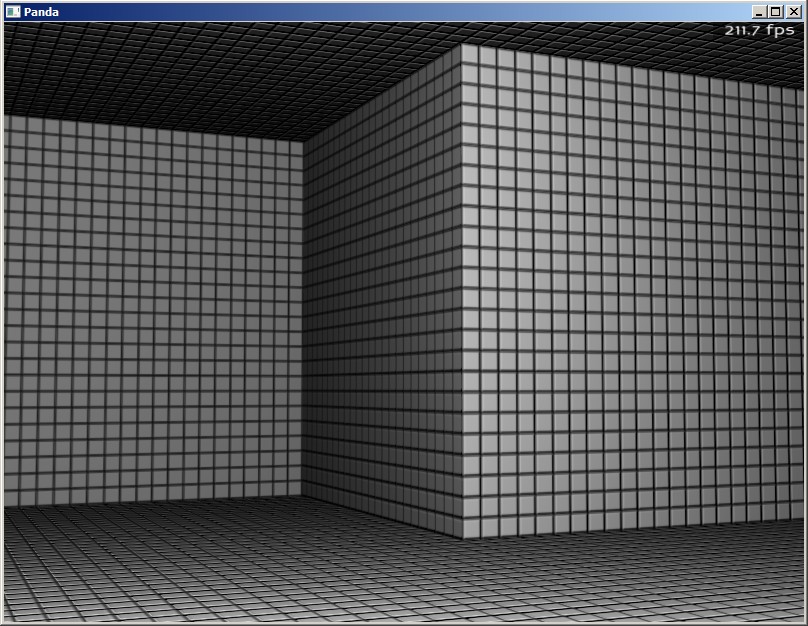
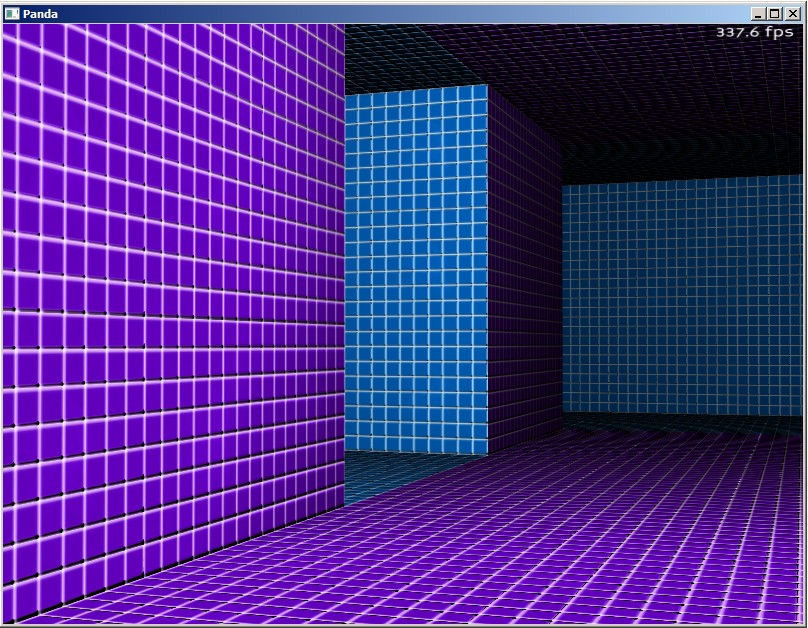
To help myself learn Panda, I’m adapting a random dungeon generator, creating the geometry and applying the materials and textures at runtime. I have it working nicely, up until the point where I try to apply separate textures to different areas of the dungeon.

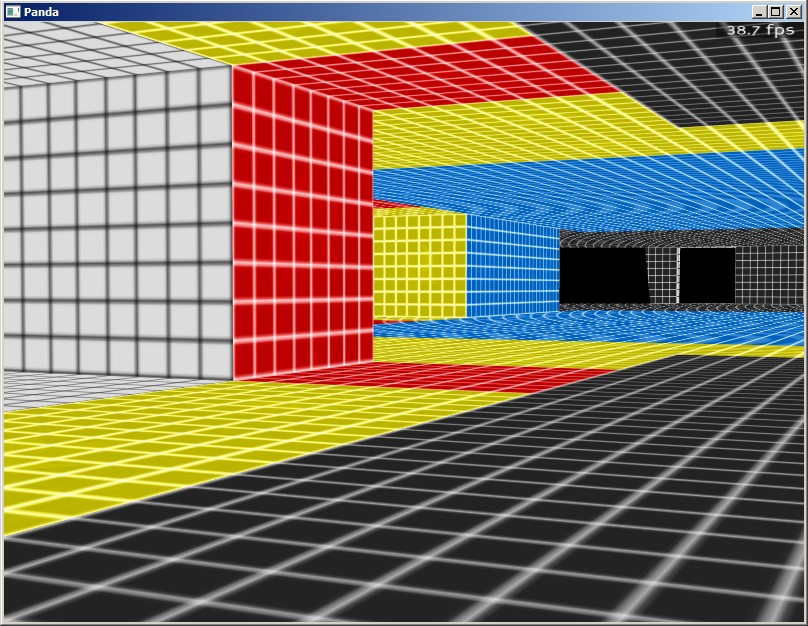
In the attached images, you can see how the model looks without multiple textures and what happens when I apply more than one texture. When I add multiple textures, I lose all normal mapping, texture scaling, and lighting effects. My frame rate also drops significantly.

Some code snippets:

        if usecolor:
            ts = TextureStage("tex")
            myDungeon.setTexScale(ts, 3, 3, 1)
            ts = TextureStage("bump")
            myDungeon.setTexScale(ts, 3, 3, 1) 
            myMaterial = Material()
            myMaterial.setShininess(10.0) #Make this material shiny
            myDungeon.setMaterial(myMaterial)
        else:        
            tex = loader.loadTexture("models/dungeon/white_tile.jpg")
            myDungeon.setTexture(tex) 
            myDungeon.setTexScale(TextureStage.getDefault(), 3, 3, 1)
            tex = loader.loadTexture("models/dungeon/tile_bump2.jpg")
            ts = TextureStage("bump")
            ts.setMode(TextureStage.MNormal)
            myDungeon.setTexScale(ts, 3, 3, 1)
            myDungeon.setTexture(ts, tex)
            myMaterial = Material()
            myMaterial.setShininess(10.0) #Make this material shiny
            myDungeon.setMaterial(myMaterial)
def colorNode(self):
        for index in range(self.geomnode.getNumGeoms()):
            if self.usecolor:
                color = self.color_lookup[index]
                name = self.colornames
                tex = loader.loadTexture("models/dungeon/%s_tile.jpg" %(name))
            else:
                tex = loader.loadTexture("models/dungeon/white_tile.jpg")
            texAttrib = TextureAttrib.make()            
            ts_tex = TextureStage("tex")
            ts_tex.setMode(TextureStage.MDecal)                
            texAttrib = texAttrib.addOnStage(ts_tex, tex)
            bump = loader.loadTexture("models/dungeon/tile_bump2.jpg")
            ts_bump = TextureStage("bump")
            ts_bump.setMode(TextureStage.MNormal)
            texAttrib = texAttrib.addOnStage(ts_bump, bump)
            newRenderState = self.geomnode.getGeomState(index).addAttrib(texAttrib)
            self.geomnode.setGeomState(index, newRenderState)
        self.geomnode.unify(self.geomnode.getNumGeoms(),1)

I’m evidently doing something wrong, in the texAttrib portion of the process. The trouble I’m having is that multiple textures need to be set on the geomNode level, but then I have to set materials and texture scaling on the nodePath level. Somewhere in the jump between these, I assume, I’m missing something. It’s a puzzle. :question:

Can anyone offer any assistance with this?

I also have a question about octree implementation for the same project, but… one question at a time. :laughing:


The speed issue was apparently due to duplicating the texAttribs for each Geom, rather than setting up one texAttrib for each texture, then setting references to the Geoms. The following code squashed that problem, but the lighting and shader issues remain. Have I missed something, in my application of texAttrib.addOnStage? :question:

def colorNode(self):
        color_attribs = []
        for i in range(len(self.colors)):
            color = self.color_lookup[i]
            name = self.colornames
            tex = loader.loadTexture("models/dungeon/%s_tile.jpg" %(name))
            texAttrib = TextureAttrib.make()            
            ts_tex = TextureStage("tex")
            ts_tex.setMode(TextureStage.MDecal)                
            texAttrib = texAttrib.addOnStage(ts_tex, tex)
            bump = loader.loadTexture("models/dungeon/tile_bump2.jpg")
            ts_bump = TextureStage("bump")
            ts_bump.setMode(TextureStage.MNormal)
            texAttrib = texAttrib.addOnStage(ts_bump, bump)
            color_attribs.append(texAttrib)
            
        for index in range(self.geomnode.getNumGeoms()):
            color = self.color_lookup[index]
            texAttrib = color_attribs
            newRenderState = self.geomnode.getGeomState(index).addAttrib(texAttrib,1)
            self.geomnode.setGeomState(index, newRenderState)

Lighting and normal-mapping effects were restored by using tex.setMode(TextureStage.MModulate), replacing mode TextureStage.MDecal.

The only trouble now is that I still can’t scale and repeat the textures. I’ve tried applying Texture.setWrapU, Texture.setWrapV, and Texture.setScalePadded, but that didn’t seem to do anything.

It looks like my binormal and tangent calculations are still a bit off, on some of the squares. That Panda Procedural Cube example is… sort of confusing. :laughing: It does a good job of showing various ways to set up a geometry, but these are perhaps not the best, or most correct, ways. I’ve had some trouble sorting out what might be oddities of Panda’s various geometry APIs and what might be just a quirky approach used in the example.

Consider the way the normals are calculated, in that Procedural Cube example. An offset is generated from each vertex position, apparently to provide smoothed normals across the faces without having to calculate the vertex norms, then average them across all faces of which that vertex would be a part. But the approach used only works when the geometry is created with all elements centered around the world origin. It took me a ridiculously long time to realize I had to calculate the normals differently in order to make things work. :laughing: I thought I was encountering some fluke of Panda’s geometry-building features, when it was actually an example which didn’t apply to my situation.

The Procedural Cube example also treats various directions in which the polygons might face as a series of special cases, rather than generalizing one way of handling all cases with the same function. I’m sure the process could be more efficient, but I haven’t quite sorted out how, yet. This forum’s own Wezu apparently made a Panda random dungeon generator in 60 lines of code, but his links are dead so I can’t see how that was done. My approach (a series of hacks, as I adapt my DBP implementation of Piichan’s Blender example to Panda) takes hundreds of lines of code. There’s surely a better way to do most of this. I wish some more effective examples were available for Panda’s geometry API. It would really help a beginner like myself figure things out. I’m a bit slow, you know, with the learning. :laughing:

So, anyway. I’m using the Cube example’s multi-case approach to building the polygons, and that requires multiple cases to handle the binormals and tangents. In some cases I need to flip things around, and I apparently haven’t sorted out how to do that right. I keep reversing one of the two, either binormal or tangent (not sure which) on the floor, as shown in the attached. Sigh.


I found a way to set the texture scaling for the model. The PandaNode at the top level wasn’t accessing the correct TextureStages when I used setTexScale(), in the code snippets shown above. I had to store the geom texture stages as I created them, then make them accessible to the top node for the scaling.

    def colorNode(self):
        color_attribs = []
        self.textureStages = []
        for i in range(len(self.colors)):            
            name = self.colornames[i]
            tex = loader.loadTexture("models/dungeon/%s_tile.jpg" %(name))
            texAttrib = TextureAttrib.make()            
            ts_tex = TextureStage("tex")
            ts_tex.setMode(TextureStage.MModulate)                
            texAttrib = texAttrib.addOnStage(ts_tex, tex)
            bump = loader.loadTexture("models/dungeon/tile_bump2.jpg")
            ts_bump = TextureStage("bump")
            ts_bump.setMode(TextureStage.MNormal)
            texAttrib = texAttrib.addOnStage(ts_bump, bump)
            color_attribs.append(texAttrib)
            self.textureStages.append([ts_tex,ts_bump])
            
        for index in range(self.geomnode.getNumGeoms()):
            color = self.color_lookup[index]
            texAttrib = color_attribs
            newRenderState = self.geomnode.getGeomState(index).addAttrib(texAttrib,1)
            self.geomnode.setGeomState(index, newRenderState)
if usecolor:
            for tex, bump in d.textureStages:                
                print tex
                myDungeon.setTexScale(tex, 3, 3, 1)                
                print bump
                myDungeon.setTexScale(bump, 3, 3, 1)            
            myMaterial = Material()
            myMaterial.setShininess(1.0) #Make this material shiny
            myDungeon.setMaterial(myMaterial)

This seems rather obvious, now that I’ve done it, but there was a lot of guesswork involved in doing it. :laughing: Since there seems to be no documentation for this sort of approach, I show here how I did it. As the attached image shows, the textures are now appropriately scaled. The image also shows a boost in frame rate, which comes from having called flattenMedium() on the top node. Using flattenStrong() gave even better performance results, but that took a long time to process the geometries. The medium flatten seems to offer a nice tradeoff between final performance and processing time.


Here is the random dungeon generator. No collisions have been set up. The core of the script is directly derived from a Blender script by Piichan under his open license. Details about sources are in the script. This also includes a modified version of consultit’s mouselook camera script, found here: [url]1st person camera, "free view" style].

My coding may not be of the highest quality, but this shows how to generate normals, binormals, and tangents at runtime, as well as how to set up multiple textures on a procedurally-generated model, as noted above. It shows how to use OnscreenImage to create a level map and how to display a player sprite on that map to show player location. I had a hard time digging up information about how to do most of this, so it seems like an example like this might be useful for the Panda community.

I had to reduce the .zip file size to post this, so I dumped most of the textures from the zip. I added to the script a function to generate the textures at runtime, so perhaps this script now illustrates how to do that, as well.
random_dungeon.zip (38.5 KB)

That looks like a rather useful contribution to the community–thank you for it. :slight_smile:

Have you considered posting your final version in Code Snippets, where it’s perhaps clearer to future searchers that this offers a finished example?

I might post it to Code Snippets once I refine it a bit. I’m currently trying to expand it to include a restart function, which effort is revealing to me that I still have a lot to learn about how Panda works. :laughing: It’s clear to me that this is not a good example (yet) of how to make a decent game in Panda. I’m not setting things up the right way in my main loop, if I can’t readily enable a restart function. So there’s some work yet to do.

I actually have some questions about how to implement collisions, in the posted script. I’ve been trying to use eggOctree, but… I’ve seen no hints about how to implement that without having to save out an egg file first. Since the point here is to do things procedurally, I don’t want to save the dungeon to egg format. (Enabling an export feature later might be worthwhile, but that would be an extra, not part of the main game functionality.)

The current form of the script does show some tricks for creating procedural geometries, however, which don’t seem to have been revealed anywhere else on the forum. Or on the internet at all, if Google results are any indication. :open_mouth: Every topic I’ve seen that delves into setting multiple textures, for instance, suggests avoiding the low-level texAttrib approach and creating a new geomNode for each geom. This code shows that the texAttrib features can be used without losing the ability to use setTexScale and other higher-level texture manipulation functions for the geometries. I’ve also seen nothing on the forum about how to generate binormals and tangents on the fly, which this script does. (It’s not difficult. Just a couple of additional crossproduct steps, to get the full set of orthonormal vectors.)

So I thought this current form might at least be useful in some respects, but it should bear a warning: Don’t make your Panda games like cdrei has, here! Learn from these tricks and approaches, perhaps, but follow better Panda practices when writing the actual game functions. Cdrei does not yet know what he’s doing, when building a Panda game. Cdrei does know a bit about working with 3D geometries, but he’s still learning Panda. Don’t be like cdrei! :laughing:

I should reveal how to “play” the example as a game. You can explore the randomly-generated dungeon environment using the mouse to drive the camera. Move the mouse to steer, hold down the left button to move forward, hold down the right button to move backward. Collisions aren’t enabled, so you can fly through a wall if you aren’t careful. Perhaps the “game” at the moment is to move through the environment without passing through walls. Sort of a steering test sort of thing. :laughing:

The “tab” key will release the mouse, but does not pause the game (it keeps running, so while you can go off and do other things, you’ll still have the processing overhead of the Panda game running in the background.) The “`” key (far upper left on keyboard, just above “tab”) will restore the game’s control of the mouse, allowing you to come back and keep playing.

Various other keyboard controls are provided by the FirstPersonCamera module, but they aren’t essential to this script. You can learn about those other controls by examining the code. Consultit did a nice job with FirstPersonCamera, which provides a very useful mouselook feature set.

This might be of interest to someone. Since I’m working toward generating everything procedurally for this project, I thought it might be nice to be able to use Panda to generate normal maps as well as color textures. A bit of digging online revealed a couple of Python resources with open licensing, from which a working normal map generating function could be derived.

The attached script is just sort of a “proof of concept” sort of thing. The script internally generates a set of PNMimages, then uses one of those to generate and save a normal map. Basically, this creates a normal map which would work with the tile textures created by the script I posted above.

This normal map script is derived from two main sources:
The height2bump Python script for PIL: http://www.pythonstuff.org/glsl/normalmaps_from_heightmaps.html
The Python Imagining Library’s source code: http://www.pythonware.com/products/pil/

The process creates a custom image-processing filter, using a kernel to define the weights by which the values of any given pixel’s neighbors are averaged with that pixel’s own values. The heavy lifting here is done by the portions derived from height2bump. The PIL excerpt in this script is from ImageFilter Kernel, and is needed to apply the kernel from height2bump to create the normal map. All I have done here is figure out how to piece things together and apply them in the context of a Panda script, with no PIL installation available.

At any rate, this shows how we could be generating normal maps at game runtime.
make_texture3.zip (3.66 KB)

The attached version of the random dungeon generator integrates the height2bump normal map generator. The zip includes no textures. All color textures and the normal map are generated internally. Otherwise this is essentially the same script as before.

The next step is to try to optimize the geometry-building portion of the dungeon generator. I inherited an approach from the Panda Procedural Cube example, but that should be able to be simplified. Hopefully. I think I can eliminate most of the cases, at least all of the reversing of orders to fix flipped normals, by handling that part of the process in the sending function.

Edit: I notice that this version of the script runs at a lower frame rate than a version which uses external textures. Either there’s some intrinsic benefit to using externally-loading textures in Panda or the memory and reference handling for the internal textures needs to be improved. As such, the approach shown here should be considered more a proof-of-concept sort of thing than a productive way of approaching texture handling in Panda.
random_dungeon2.zip (11.4 KB)

The lower FPS rate when using internal textures not saved to disk (noted above) seems to relate to TexturePool handling. Textures created as tex = Texture(PNMImage) need to be explicitly added to the texture pool using TexturePool.addTexture(tex).

tex = Texture(name)
tex.setFullpath(my_dummy_path_for_unsaved_texture)
tex.load(img)
TexturePool.addTexture(tex)

Doing this improves the FPS somewhat, but not as much as using externally-loaded textures. There still seems to be some extra texture memory overhead somewhere. :question:

Sadly, none of this seems to be documented or illustrated by examples. :cry: So, you know. I’m left guess as to why there is this slowdown.