Collaborative Sci-Fantasy Tech Demo for an Official Panda3D Showcase

That shouldn’t be a problem, I imagine. I see little reason to insist on there being text on the starship, and if we really do want any, it might be applied via decals.

Honestly, I’m envisaging the “plates” less as, well, plates, and more as “chunks”; sections of starship-structure. In the case of flat elements, such as wings, they might end up as flat plates. But in the case of elements of other elements, like guns, they might end up with other forms.

Imagine, for example, some sort of blaster-cannon. Its base is a squat, square, chunky thing, from which extend a quad of rails–these magnetically direct the bolt of plasma that the weapon launches.

In this case, I might imagine the “plates” as being:

  • The base
  • And each of the rails.

For another example, in the case of a cockpit the “plates” might be the control console, the chair, and the surrounding “pit”.

Fair enough! What I was thinking about were indeed specifically the “chunks” of the hull; I should’ve mentioned that.

1 Like

Here’s the starship + hangar model for you to play around with. It’s a work in progress.

hangar_1_cont2.zip (2.1 MB)

Real life ships are built on a strongback ladder (in some cases), also with scaffolds, assembled in frames typically, by section. But this is sci-fi, so we could just put some particle effects under the bottom of the ship or something and say “it’s magic!”. The assembly and disassembly of the working structure around the hull takes a lot of time in real life, which is boring.

I was thinking something similar: Imagine the ship bathed in a broad beam of flowing light that holds it aloft until it’s ready.

Looks like we all had more or less the same idea. Cool :slight_smile: !

Thanks :slight_smile: !
There didn’t appear to be any vertex colors applied to the starship model yet, so I decided to play around a bit with Vertex Paint in Blender myself… and I got things to work the way I wanted! As I don’t know how to make a Blender script, I had to apply the colors manually, so I only colored a small part of the model, but at least now I know that my script works as intended :slight_smile: .

By the way, can color values in Blender’s color picker interface be displayed in the [0, 255] integer range instead of the [0., 1.] float range? And if there’s a way to more easily increment a color value than dragging a slider or typing in the new value (e.g. pressing +-key or something), I’d love to hear it too!
All in all, I have to admit that the latest Blender versions (I used version 2.91) have indeed become a lot more intuitive, as I can actually figure some things out now without having to “RTFM” :grin: !

Here is the result of my mucking about with vertex colors (only the left rear of the main ship hull is done):

hangar_1_cont4.zip (2.2 MB)

Updated creation script:

#!/usr/bin/env python

from panda3d.core import *
import os
import array


loader = Loader.get_global_ptr()
loader_options = LoaderOptions(LoaderOptions.LF_no_cache)

models = []
model_names = []

original_format = GeomVertexFormat.get_v3n3t2()

# define custom vertex format with float color column
vertex_format = GeomVertexFormat()
array_format = GeomVertexArrayFormat()
array_format.add_column(InternalName.get_vertex(), 3, GeomEnums.NT_float32, GeomEnums.C_point)
array_format.add_column(InternalName.get_normal(), 3, GeomEnums.NT_float32, GeomEnums.C_normal)
array_format.add_column(InternalName.get_texcoord(), 2, GeomEnums.NT_float32, GeomEnums.C_texcoord)
array_format.add_column(InternalName.get_color(), 4, GeomEnums.NT_float32, GeomEnums.C_color)
vertex_format.add_array(array_format)
float_color_format = GeomVertexFormat.register_format(vertex_format)

# define custom vertex format with a separate int color column
vertex_format = GeomVertexFormat()
array_format = GeomVertexArrayFormat()
array_format.add_column(InternalName.get_vertex(), 3, GeomEnums.NT_float32, GeomEnums.C_point)
array_format.add_column(InternalName.get_normal(), 3, GeomEnums.NT_float32, GeomEnums.C_normal)
array_format.add_column(InternalName.get_texcoord(), 2, GeomEnums.NT_float32, GeomEnums.C_texcoord)
vertex_format.add_array(array_format)
array_format = GeomVertexArrayFormat()
array_format.add_column(InternalName.get_color(), 4, GeomEnums.NT_uint8, GeomEnums.C_color)
vertex_format.add_array(array_format)
int_color_format = GeomVertexFormat.register_format(vertex_format)

# collect all model names
for name in os.listdir("."):
    if os.path.splitext(name)[1].lower() in (".bam", ".egg", ".fbx", ".gltf"):
        model_names.append(name)

# load all models
for name in model_names:
    for node in model.find_all_matches("**/+GeomNode"):
        node.node().modify_geom(0).modify_vertex_data().format = float_color_format
    model = NodePath(loader.load_sync(name, loader_options))
    model.flatten_strong()  # bake the transforms into the vertices
    for node in model.find_all_matches("**/+GeomNode"):
        models.append(node)

tmp_data_views = []
tmp_prim_views = []
sorted_indices = []
vert_count = 0
prim_vert_count = 0

# process all models
for model in models:

    geom = model.node().modify_geom(0)
    v_data = geom.get_vertex_data()
    tmp_v_data = GeomVertexData(v_data)
    tmp_v_data.format = float_color_format
    data_size = tmp_v_data.get_num_rows()
    tmp_data_view = memoryview(tmp_v_data.arrays[0]).cast("B").cast("f")
    tmp_data_views.append(tmp_data_view)
    tmp_v_data.format = int_color_format
    color_array = tmp_v_data.arrays[1]
    color_view = memoryview(color_array).cast("B")
    prim = geom.modify_primitive(0)
    prim.set_index_type(GeomEnums.NT_uint32)
    prim_size = prim.get_num_vertices()
    prim.offset_vertices(vert_count, 0, prim_size)
    prim_view = memoryview(prim.get_vertices()).cast("B").cast("I")
    tmp_prim_views.append(prim_view)

    for j, color in enumerate(color_view[i:i+4] for i in range(0, len(color_view), 4)):
        r, g, b, a = color
        sort = r << 16 | g << 8 | b
        sorted_indices.append((sort, vert_count + j))

    vert_count += data_size
    prim_vert_count += prim_size

sorted_indices.sort()
sort_values = [i[0] for i in sorted_indices]
sorted_indices = [i[1] for i in sorted_indices]

new_data = GeomVertexData("data", float_color_format, GeomEnums.UH_static)
data_array = new_data.modify_array(0)
data_array.set_num_rows(vert_count)
new_data_view = memoryview(data_array).cast("B").cast("f")
start = 0

for tmp_data_view in tmp_data_views:
    end = start + len(tmp_data_view)
    new_data_view[start:end] = tmp_data_view
    start = end

new_data.format = original_format

tmp_prim = GeomTriangles(GeomEnums.UH_static)
tmp_prim.set_index_type(GeomEnums.NT_uint32)
prim_array = tmp_prim.modify_vertices()
prim_array.set_num_rows(prim_vert_count)
prim_view = memoryview(prim_array).cast("B").cast("I")
start = 0

for tmp_prim_view in tmp_prim_views:
    end = start + len(tmp_prim_view)
    prim_view[start:end] = tmp_prim_view
    start = end

sorted_tris = []

for tri in (prim_view[i:i+3] for i in range(0, len(prim_view), 3)):
    tri_indices = [sorted_indices.index(i) for i in tri]
    sorted_tris.append((min(tri_indices), tri.tolist()))

sorted_tris.sort(reverse=True)
index, tri = sorted_tris.pop()
sort_val = sort_values[index]
tris = [tri]
tris_by_sort = [tris]

while sorted_tris:

    index, tri = sorted_tris.pop()
    next_sort_val = sort_values[index]

    if next_sort_val == sort_val:
        tris.append(tri)
    else:
        tris = [tri]
        tris_by_sort.append(tris)
        sort_val = next_sort_val

geom = Geom(new_data)

for tris in tris_by_sort:
    new_prim = GeomTriangles(GeomEnums.UH_static)
    new_prim.set_index_type(GeomEnums.NT_uint32)
    prim_array = new_prim.modify_vertices()
    tri_rows = sum(tris, [])
    prim_array.set_num_rows(len(tri_rows))
    new_prim_view = memoryview(prim_array).cast("B").cast("I")
    new_prim_view[:] = array.array("I", tri_rows)
    geom.add_primitive(new_prim)

geom_node = GeomNode("starship")
geom_node.add_geom(geom)
NodePath(geom_node).write_bam_file("starship.bam")

Updated application code:

from direct.showbase.ShowBase import ShowBase
from panda3d.core import *

class Game(ShowBase):

    def __init__(self):

        ShowBase.__init__(self)

        self.disableMouse()

        # set up a light source
        p_light = PointLight("point_light")
        p_light.set_color((1., 1., 1., 1.))
        self.light = self.camera.attach_new_node(p_light)
        self.light.set_pos(5., -100., 7.)
        self.render.set_light(self.light)

        self.camera.set_pos(26.8519, 91.9869, 11.2998)
        self.camera.set_hpr(157.174, -3.38226, 6.69603)

        self.model = self.loader.load_model("starship.bam")
        self.model.reparent_to(self.render)

        bounds = self.model.node().get_bounds()
        geom = self.model.node().modify_geom(0)
        new_prim = GeomTriangles(GeomEnums.UH_static)
        new_prim.set_index_type(GeomEnums.NT_uint32)
        self.primitives = [prim for prim in geom.primitives]
        self.primitives.reverse()
        geom.clear_primitives()
        geom.add_primitive(new_prim)
        self.model.node().set_bounds(bounds)
        self.model.node().set_final(True)
        self.task_mgr.add(self.__build_starship, "build_starship", delay=0.5)

    def __build_starship(self, task):

        prim = self.primitives.pop()
        prim_array = prim.get_vertices()
        prim_view = memoryview(prim_array).cast("B").cast("I")
        geom = self.model.node().modify_geom(0)
        new_prim = geom.modify_primitive(0)
        new_prim_array = new_prim.modify_vertices()
        old_size = new_prim_array.get_num_rows()
        new_prim_array.set_num_rows(old_size + len(prim_view))
        new_prim_view = memoryview(new_prim_array).cast("B").cast("I")
        new_prim_view[old_size:] = prim_view[:]

        if self.primitives:
            return task.again


game = Game()
game.run()

Note that I’ve set a delay of half a second before generating each next plate – otherwise the construction process would now actually be too fast!

2 Likes

I quite like Blender 2.9 . It took me a few months to get used to the interface, but we still have model quad view, the navigation gizmo is great, and there’s live path tracing support among other things.

Here’s a few resources offhand for vertex coloring: https://medium.com/benlearnsblender/using-vertex-colors-in-blender-2-8-8396352b29c4

This snippet is maybe out of date but I’ll put it here anyway:

for ipoly in range(len(ob.data.polygons)):
    for ivertex in ob.data.polygons[ipoly].loop_indices:
        ob.data.vertex_colors["col"].data[ivertex].color = (R,G,B)

(from How to view vertex' colors? - Blender Stack Exchange )

2 Likes

I’m glad to read that Blender is so much more friendly to new users! :slight_smile: I do recall it being rather less so back when I started using it!

(I do still mean to get to the new versions of Blender someday. ^^; )

This does look like good progress, I think! :slight_smile:

1 Like

This is easy to do with the user interface, please let me know if you need it. I can create a lightweight plugin for this.

2 Likes

Please note that Blender uses sRGB colors but the floating point 0…1 values are linearised, so don’t be tempted to simply multiply the values by 255–this would not be correct!

Panda provides encode_sRGB_uchar etc. functions to do this conversion.

1 Like

You’re a visionary, and that’s what I’m going to do.

However, this is not a problem if you install panda in blender, but the plugin will no longer be easy.
There is another option, change the column type to Geom.NT_uint8 and handle on the panda side.

1 Like

Thank you very much for this article! The most important thing I learned from it is the shift-k hotkey to apply the vertex color without having to manually paint it – and I therefore no longer have to worry about adjusting advanced Color Picker settings like falloff curves or such. Great time-saver!

Thanks! At some point I’ll have to learn how to work with Blender scripts.

So true! With the old versions it took me a long time to figure out even basic things like how to navigate the scene! :sweat_smile: So as Simulan said it’s great to have a navigation gizmo now, for example.

You should definitely try them out. Download the portable versions if you can; that way you can compare multiple versions side-by-side without having to install anything.

Thanks! :slight_smile:

If you mean incrementing the color value specifically, that would be great! Thanks so much in advance! :slight_smile:

As long as the color value as displayed in the Color Picker can be incremented enough to result in a new color, then that’s fine. The reason I preferred integer values was that it would be easier to type in the next higher value, but if I could use a script/plugin, then that would no longer be necessary.

If you could make it so the color starts at:

red: 0.0, green: 0.0, blue: 0.0

then increases to:

red: 0.0, green: 0.0, blue: 1.0

then to:

red: 0.0, green: 1.0, blue: 1.0 (increasing the blue channel from 0.0 to 1.0 for each increment of the green channel)

and finally to:

red: 1.0, green: 1.0, blue: 1.0

That would lead to the most possible different color values (16777215). If that’s too hard to implement, incrementing all 3 channels at once could already be enough, although we are then limited to 255 different “plates” for each ship component.

Indeed, my creation script already does this and it seems to work as expected :slight_smile: .

1 Like

I’ll probably do so once my main project–which has a pipeline that relies on Blender <2.8 and YABEE–is done, I think.

If I understand correctly, you need the color data not for rendering, but for logic. Accordingly, it does not matter whether the color is linear RGB or non-linear sRGB. Then perhaps I think just manually set the colors for each of the channels will be sufficient.

We should probably make a post with all the most-used Blender 2.8 / 2.9 hotkeys.

  • ‘z’ to get the render pie menu
  • ‘ctrl-j’ to join two scene meshes
  • ‘ctrl-p’ to bind a mesh to an armature
  • ‘ctrl-alt-q’ to toggle the quad view
  • ‘alt-shift-mouse1’ to loop select
  • ‘n’ to open the Item/Tool/View options for IE setting the focal length of the view
  • ‘t’ to cycle the Tool menu (especially if it’s hidden by default like in the Shading menu)
1 Like

Yes, that is correct.

Actually I managed to write a Blender script that works exactly as I wanted it! :slight_smile:
This video helped me a lot in figuring out how to start with scripting in Blender (quick and dirty, but it gets the job done).
Here’s the script (probably needs a lot of cleaning up):

bl_info = {
    "name": "Increment vertex color",
    "author": "Epihaius",
    "version": (1, 0),
    "blender": (2, 80, 0),
    "location": "Scene Properties > Increment vertex color",
    "description": "Increments the color value of the Color Picker",
    "warning": "",
    "doc_url": "",
    "category": "Scene",
}


import bpy


def main(context):
    bpy.ops.object.editmode_toggle()
    bpy.ops.paint.vertex_paint_toggle()

    bpy.data.brushes["Draw"].color[2] += 1. / 255.

    if bpy.data.brushes["Draw"].color[2] >= 1.:
        bpy.data.brushes["Draw"].color[2] = 0.
        bpy.data.brushes["Draw"].color[1] += 1. / 255
        if bpy.data.brushes["Draw"].color[1] >= 1.:
            bpy.data.brushes["Draw"].color[1] = 0.
            bpy.data.brushes["Draw"].color[0] += 1. / 255

    bpy.ops.paint.vertex_color_set()
    bpy.ops.paint.vertex_paint_toggle()
    bpy.ops.object.editmode_toggle()


class SimpleOperator(bpy.types.Operator):
    """Tooltip"""
    bl_idname = "object.simple_operator"
    bl_label = "Increment vertex color"

    def execute(self, context):
        main(context)
        return {'FINISHED'}


class VertexColorIncrPanel(bpy.types.Panel):
    """Creates a Panel in the scene context of the properties editor"""
    bl_label = "Increment vertex color"
    bl_idname = "SCENE_PT_layout"
    bl_space_type = 'PROPERTIES'
    bl_region_type = 'WINDOW'
    bl_context = "scene"

    def draw(self, context):
        layout = self.layout

        scene = context.scene

        # Big button
        layout.label(text="Increment vertex color:")
        row = layout.row()
        row.scale_y = 2.0
        row.operator("object.simple_operator")


def register():
    bpy.utils.register_class(SimpleOperator)
    bpy.utils.register_class(VertexColorIncrPanel)


def unregister():
    bpy.utils.unregister_class(SimpleOperator)
    bpy.utils.unregister_class(VertexColorIncrPanel)


if __name__ == "__main__":
    register()

You can install it as an add-on and use it like this:

  • enter Vertex Paint mode, make sure the “Face selection masking for painting” option (button directly to right of mode dropdown-list) is active, set the current color in the Color Picker to pure black, and then enter Edit Mode; from now on, you no longer have to enter Vertex Paint mode again;
  • select the polys you want to belong to the first “plate”;
  • find the new “Increment vertex color” button in the “Scene Properties” panel and click it once;
  • select the polys for the next (adjacent) plate and click the “Increment vertex color” button again;
  • rinse and repeat!

Easy as Py(thon). :wink:

3 Likes

I did the same, but added 4 components, and made each button, for each channel.

1 Like

Published!

2 Likes

Update!

Firstly, the creation script that I added to this post has been edited to fix an issue with vertex normals.
There seems to be a bug in flatten_strong with the .fbx models in particular, where it applies the scale on the GeomNode to its vertex normals instead of preserving their unit-length. (A bug report has already been filed here.) The edited script works around this issue by setting a new format on the vertex data, which seems to fix it.

The biggest change however, is in the way “plates” – let’s just call them “parts” in general from now on, as they are understood to be the most atomic elements of the starship – of the main hull are generated! Up till now, they were all nicely generated in succession, while we were patiently(?) waiting for the whole procedure to finish. After watching that for a while, it gets predictable, repetitive and thus quite boring. To spice things up a bit, I’ve moved up the generation start of those parts that can be considered to make up the next “section” of the main starship hull. Such a section is like a vertical slice of the hull, or a “ring of plates”.
Specifically, when 2 parts have been generated for the current section, the first part of the next section gets generated, together with the third part of the current section. This again decreases the total generation time.

Furthermore, the generation time has been randomized a bit for more variety in the process.

The parts themselves have now become separate, temporary nodes, so it is possible to apply all kinds of effects to them without affecting the actual starship model.

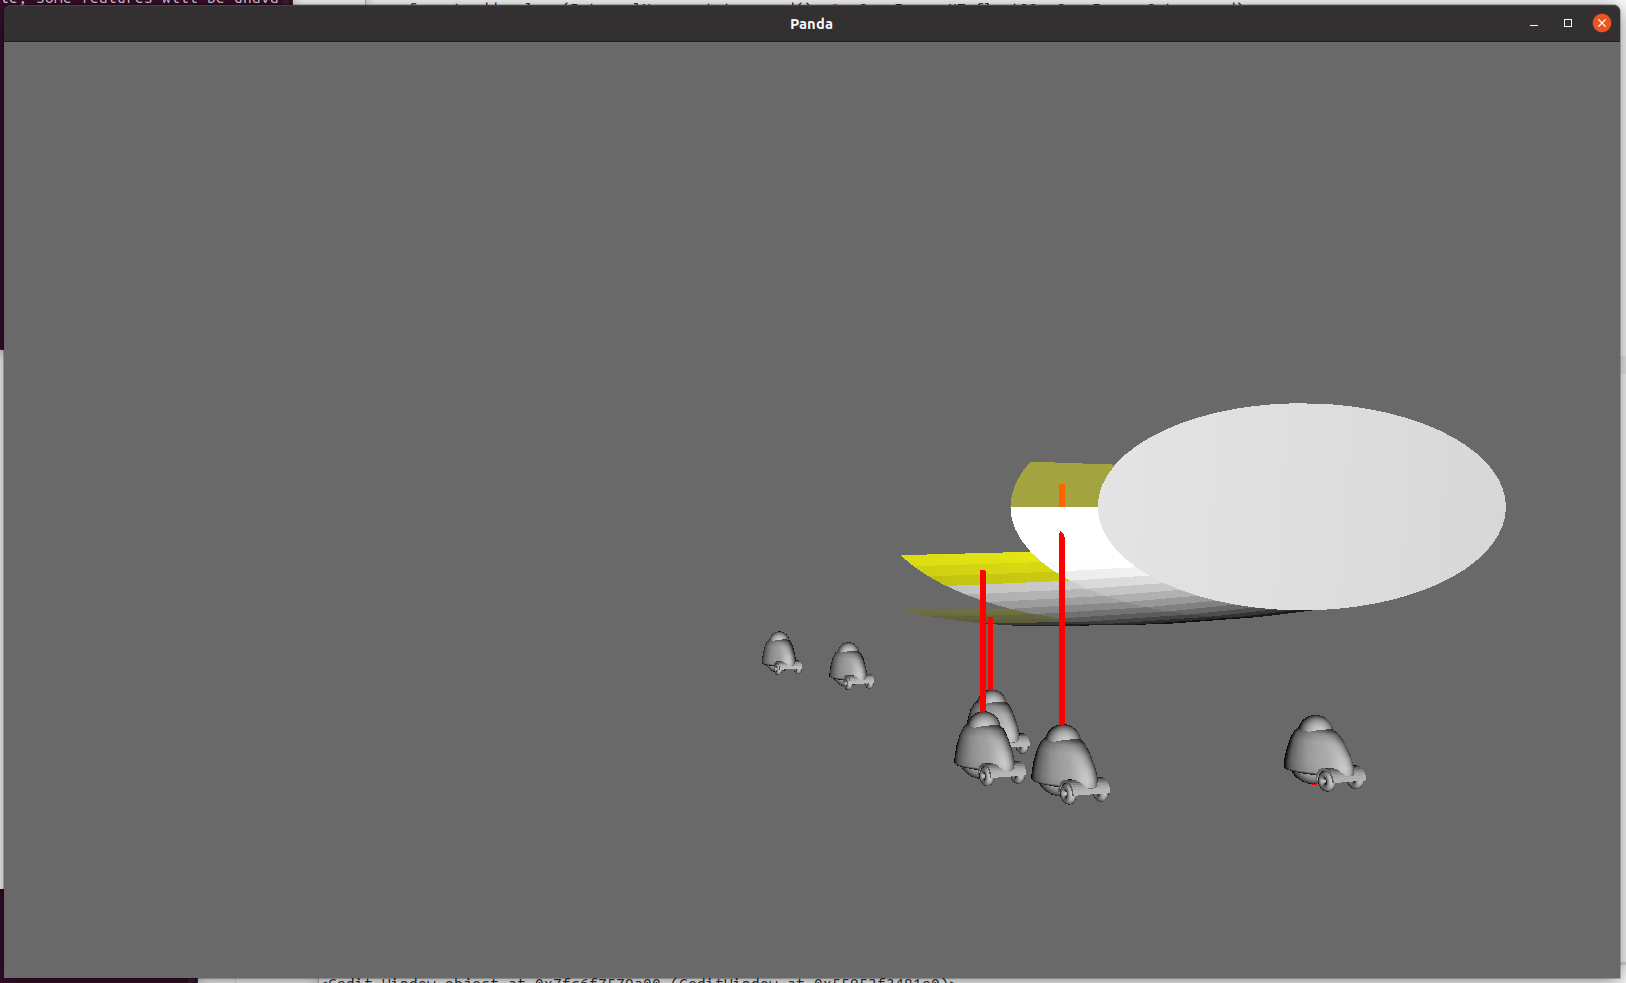
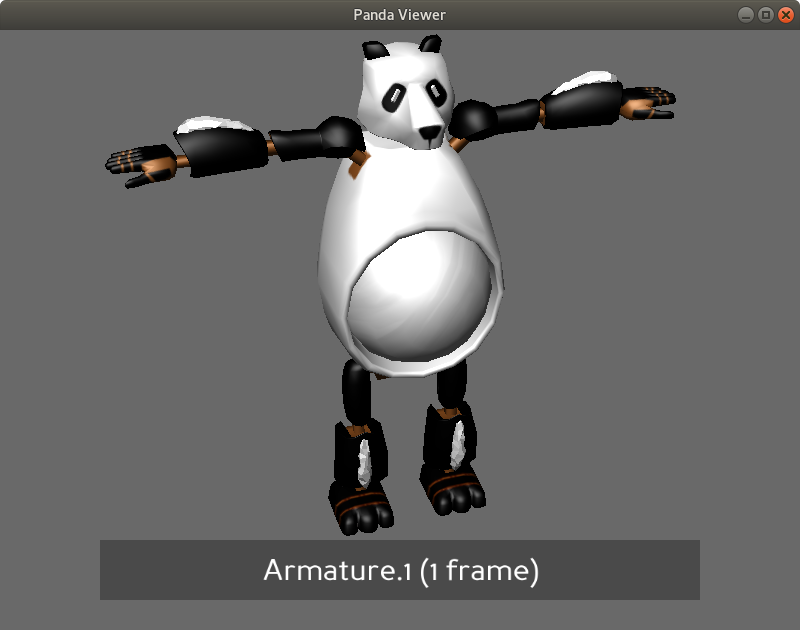
And last but certainly not least: I made a builder-bot model in Blender! :slight_smile: (So maybe it looks more like a vacuum-cleaner than a robot, but that’s OK. :stuck_out_tongue: )

models.zip (1.4 MB)

Seriously though, this is the kind of look I was going for – at least for the “ground-bots”, which are responsible for generating the bottom parts of the ship. For the upper parts, I’d like to have aerial, drone-like bots.

Here is a completely new main script, showcasing the builder-bots shooting red energy beams onto the generated parts as the camera slowly orbits around the ship:

from direct.showbase.ShowBase import ShowBase
from panda3d.core import *
from random import random
import array


base = ShowBase()


def create_beam():

    from math import pi, sin, cos

    data = array.array("f", [])
    segs = 6
    vert_count = 0

    for i in range(segs + 1):
        angle = pi * 2 / segs * i
        x = sin(angle)
        z = -cos(angle)
        data.extend((x, 0., z, x, 1., z))
        vert_count += 2

    vertex_format = GeomVertexFormat.get_v3()
    v_data = GeomVertexData("data", vertex_format, GeomEnums.UH_static)
    data_array = v_data.modify_array(0)
    data_array.unclean_set_num_rows(vert_count)
    view = memoryview(data_array).cast("B").cast("f")
    view[:] = data

    prim = GeomTriangles(GeomEnums.UH_static)

    for i in range(segs):
        i1 = i * 2
        i2 = i1 + 1
        i3 = i2 + 1
        i4 = i3 + 1
        prim.add_vertices(i1, i2, i3)
        prim.add_vertices(i2, i4, i3)

    geom = Geom(v_data)
    geom.add_primitive(prim)

    node = GeomNode("beam")
    node.add_geom(geom)
    beam = NodePath(node)
    beam.set_light_off()
    beam.set_color(1., 0., 0., 1.)

    return beam


class BuilderBot:

    def __init__(self, model, beam):

        self.model = model
        self.beam = beam.copy_to(self.model)
        beam.set_pos(0., 0., 2.3)
        beam.set_sy(.1)

    def set_part(self, part):

        if part:
            x, y, z = part.center
            self.model.set_pos(x, y, 0.)
            dist = (part.center - self.beam.get_pos(base.render)).length()
            self.beam.set_sy(dist)
            self.beam.look_at(base.render, part.center)
        else:
            self.beam.set_sy(.1)


class Section:

    def __init__(self, primitives):

        self.primitives = primitives
        self.generation_count = 0

    def __bool__(self):

        return True if self.primitives else False

    def __len__(self):

        return len(self.primitives)

    def generate(self, vertex_data):

        if not self.primitives:
            return

        self.generation_count += 1
        prim = self.primitives.pop(0)
        self.part = Part(vertex_data, prim)

        return self.part


class Part:

    def __init__(self, vertex_data, primitive):

        geom = Geom(vertex_data)
        geom.add_primitive(primitive)
        self.primitive = primitive

        node = GeomNode("part")
        node.add_geom(geom)

        self.model = NodePath(node)
        self.model.set_transparency(TransparencyAttrib.M_alpha)
        self.model.set_color(1., 1., 0., 1.)
        self.model.set_alpha_scale(0.)
        p_min, p_max = self.model.get_tight_bounds()
        self.center = p_min + (p_max - p_min) * .5

    def destroy(self):

        self.model.detach_node()
        self.model = None

    def solidify(self, task, duration, finalizer):

        self.model.set_alpha_scale(task.time / duration)

        if task.time < duration:
            return task.cont

        finalizer(self.primitive)
        self.destroy()


class Demo:

    def __init__(self):

        base.disableMouse()

        # set up a light source
        p_light = PointLight("point_light")
        p_light.set_color((1., 1., 1., 1.))
        self.light = base.camera.attach_new_node(p_light)
        self.light.set_pos(5., -100., 7.)
        base.render.set_light(self.light)

        self.model = base.loader.load_model("starship.bam")
        self.model.reparent_to(base.render)

        p_min, p_max = self.model.get_tight_bounds()
        ship_size = (p_max - p_min).length()
        self.cam_dist = ship_size# * 1.5
        self.cam_heading = 180.
        self.cam_target = base.render.attach_new_node("cam_target")
        x, y, z = self.model.get_pos()
        self.cam_target.set_pos(x, y, 10.)
        self.cam_target.set_h(self.cam_heading)
        base.camera.reparent_to(self.cam_target)
        base.camera.set_y(-self.cam_dist)

        beam = create_beam()
        beam.set_scale(.1)
        self.builder_bots = []
        self.active_builder_bots = []
        offset = (p_max - p_min).y / 10.

        for i in range(6):
            model = base.loader.load_model("builder_bot.fbx")
            model.reparent_to(base.render)
            model.set_pos(0., p_max.y - offset * i, 0.)
            bot = BuilderBot(model, beam)
            self.builder_bots.append(bot)

        bounds = self.model.node().get_bounds()
        geom = self.model.node().modify_geom(0)
        self.vertex_data = geom.get_vertex_data()
        new_prim = GeomTriangles(GeomEnums.UH_static)
        new_prim.set_index_type(GeomEnums.NT_uint32)
        self.prim_count = 0

        primitives = [prim for prim in geom.primitives]
        primitives.pop()  # remove the last, uncolored ship part

        # Divide the hull into (predefined) sections.
        # Each section will be generated with one bot for the bottom half and
        # one drone for the upper half.

        self.sections = []
        self.sections.append(Section(primitives[:1]))  # rear polygon
        del primitives[:1]

        for _ in range(8):  # 8 sections each containing 10 hull plates
            self.sections.append(Section(primitives[:10]))
            del primitives[:10]

        self.sections.append(Section(primitives[:7]))  # section with 7 plates
        del primitives[:7]
        self.sections.append(Section(primitives[:10]))  # section with 10 plates
        del primitives[:10]
        self.sections.append(Section(primitives))

        # prune any invalid sections
        self.sections = [s for s in self.sections if s]

        section = self.sections.pop(0)
        bot = self.builder_bots.pop(0)
        self.active_builder_bots.append(bot)

        geom.clear_primitives()
        geom.add_primitive(new_prim)
        self.model.node().set_bounds(bounds)
        self.model.node().set_final(True)
        base.task_mgr.add(self.__move_camera, "move_camera")
        build_task = lambda task: self.__build_section(task, section, bot)
        base.task_mgr.add(build_task, "build_section", delay=0.5)

    def __move_camera(self, task):

        self.cam_heading -= 1.75 * globalClock.get_dt()
        self.cam_target.set_h(self.cam_heading)

        return task.cont

    def __add_primitive(self, prim):

        prim_array = prim.get_vertices()
        prim_view = memoryview(prim_array).cast("B").cast("I")
        geom = self.model.node().modify_geom(0)
        new_prim = geom.modify_primitive(0)
        new_prim_array = new_prim.modify_vertices()
        old_size = new_prim_array.get_num_rows()
        new_prim_array.set_num_rows(old_size + len(prim_view))
        new_prim_view = memoryview(new_prim_array).cast("B").cast("I")
        new_prim_view[old_size:] = prim_view[:]

    def __build_section(self, task, section, bot):

        part = section.generate(self.vertex_data)
        part.model.reparent_to(base.render)
        solidify_task = lambda task: part.solidify(task, 1.5, self.__add_primitive)
        base.task_mgr.add(solidify_task, "solidify")
        deactivation_task = lambda task: bot.set_part(None)
        base.task_mgr.add(deactivation_task, "deactivate_beam", delay=1.5)
        bot.set_part(part)

        if section.generation_count == min(len(section) + 1, 2) and self.sections:
            next_section = self.sections.pop(0)
            next_bot = self.builder_bots.pop(0)
            self.active_builder_bots.append(next_bot)
            next_build_task = lambda task: self.__build_section(task, next_section, next_bot)
            delay = 1.6 + random()
            base.task_mgr.add(next_build_task, "build_section", delay=delay)

        if section:
            task.delayTime = 1.6 + random()
            return task.again

        self.active_builder_bots.remove(bot)
        self.builder_bots.append(bot)


game = Demo()
base.run()

At the moment, the bots just “teleport” all over the place instead of actually moving. This will be quite a bit of work to get right, using intervals or tasks. Will see what we can do.
Note that I made some mistakes when coloring the parts near the front of the ship in Blender, resulting in a couple of unintended holes – just ignore. :grin:

Anyway, I hope you will enjoy this update, as it is already far closer to what I originally imagined. :slight_smile:

2 Likes

Thanks for keeping up the great work here. I think that we can pull off this demo. I’ll try to find some time to get these updates working in my updated environments.

One thing though – I don’t know what’s going on with the .zip file of the hangar_1_cont5.zip file, but it just extracts as an empty folder called hangar_1_cont5.fbx : / I can import the .fbx file included in the models.zip however.

Just saw the edits on this post: Collaborative Sci-Fantasy Tech Demo for an Official Panda3D Showcase - #45 by Epihaius

The hangar_1_cont4.zip file extracts just fine.

Update:

I was able to get the whole setup working, to a preliminary point, on my system. Here’s a screencap:

It did require me to use the original model loading snippet:

# collect all model names
for name in os.listdir("."):
    if os.path.splitext(name)[1].lower() in (".bam", ".egg", ".fbx", ".gltf"):
        model_names.append(name)

# load all models
for name in model_names:
    model = NodePath(loader.load_sync(name, loader_options))
    model.flatten_strong()  # bake the transforms into the vertices
    for node in model.find_all_matches("**/+GeomNode"):
        models.append(node)

– instead of the new one. The new one had a model loading error.

It’s cool to see the color fade-in of the plates as they are generated. That’s a big step in the right conceptual direction, I think! I do agree that the movement of the bots will be somewhat tricky; I’ll give it some thought. One idea that immediately comes to mind is to have the bots hover in the air like “generation quadcopters” or just free orbiting around the ship as it’s constructed. Might help with the laser clipping issue.

1 Like

Very neat! This does look improved indeed! I do particularly like having multiple parts be “constructed” at once. :slight_smile:

I might actually suggest speeding up the process further; I found that a base-delay of 0.5 looked nice, although reducing it further still might be better still.

Regarding the movement of the 'bots, a thought that occurs to me for a flying bot is to have it keep a set distance from the ship, moving freely only down the length of the ship, and to circle around the ship to adjust its position in other dimensions.

Bots might be prevented from colliding by adjusting their “set distance” when they find themselves close to another bot in both position along the ship’s length and rotational angle.

(I would do all of this in an update-task, myself–but that’s likely at least in part because I’ve seldom gotten along with intervals. :P)

I did get a crash during the run of the program, a short while after starting it. The error was as follows:

Traceback (most recent call last):
  File "main.py", line 249, in <lambda>
    next_build_task = lambda task: self.__build_section(task, next_section, next_bot)
  File "main.py", line 238, in __build_section
    part.model.reparent_to(base.render)
AttributeError: 'NoneType' object has no attribute 'model'
:task(error): Exception occurred in PythonTask build_section
Traceback (most recent call last):
  File "main.py", line 262, in <module>
    base.run()
  File "/home/thaumaturge/.local/lib/python3.6/site-packages/direct/showbase/ShowBase.py", line 3325, in run
    self.taskMgr.run()
  File "/home/thaumaturge/.local/lib/python3.6/site-packages/direct/task/Task.py", line 546, in run
    self.step()
  File "/home/thaumaturge/.local/lib/python3.6/site-packages/direct/task/Task.py", line 500, in step
    self.mgr.poll()
  File "main.py", line 249, in <lambda>
    next_build_task = lambda task: self.__build_section(task, next_section, next_bot)
  File "main.py", line 238, in __build_section
    part.model.reparent_to(base.render)
AttributeError: 'NoneType' object has no attribute 'model'

As to my own contributions, PAnDA continues to see progress. Said progress is a bit slow, I’ afraid, as I’m only giving the model a little time in the evenings, but it is progress nevertheless.

Here’s a quick screenshot to show the model at time of writing:

Note that it still has neither normal- nor gloss- nor glow- maps as of yet, and that the colour-map is still very much a work-in-progress.

3 Likes